


When I lived in Toronto, I learned how to make Chinese steamed pork buns from my Korean-Chinese friend, Ms. Bong.
Ms. Bong’s story relating to this food fascinated me for a while. She said:
“We used to make a large quantity at once, enough to eat for the whole winter. We kept hundreds of steamed pork buns in earthenware pots in the yard. The weather was so cold that the buns were frozen the whole winter, until we finished them. They were hard as stones the whole time. We ate them every other day, not as a snack, but as a meal. We used to bring some frozen buns to the kitchen, thaw them out, steam them, and eat them.”
I was overwhelmed by this story. I could picture them making the buns and keeping them in a huge earthenware pot. I could imagine them bringing some to their kitchen, thawing them out, and eating them with the whole family! Ms. Bong said they usually served them with rice porridge for a meal.
The small rolling pin that I use in this video was given to me by her. When she gave me the rolling pin, I was so excited that I ran to Chinatown to buy my steamer! The steamer has been one of my most precious kitchen items for 3 years. : )
I modified the filling to be more like a Korean style filling. Real Chinese steamed buns use ground pork, dried shrimp, chives, and blanched napa cabbage.
Yield:
16 steamed pork buns (6-8 servings)
Ingredients
For the dough
- 1 cup warm water (under 40° Celsius, or 100° F)
- 1 teaspoon sugar
- 2 teaspoons dry yeast
- 1/2 teaspoon kosher salt
- 1 tablespoon vegetable oil
- 3 cups all purpose flour
For the filling
- 1 cup chopped onion
- 1/2 cup chopped carrot
- 1 1/2 cup chopped zucchini
- 1 1/2 cup chopped green onion(or Asian chives)
- 2 cups chopped white mushrooms
- 1 teaspoon Kosher salt
- 14 ounces (400 grams) ground pork
- 1 teaspoon soy sauce
- 4 garlic cloves, minced
- 1 teaspoon sugar
- 1 teaspoon toasted sesame oil
- 1/2 teaspoon ground black pepper
- 1 tablespoon vegetable oil
For the dipping sauce:
- ⅓ cup soy sauce
- 2 tablespoons vinegar
- 2 teaspoons sugar
- 1/2 cup onion, cut into chunks
- 1 or 2 green chili peppers, sliced
- 1 teaspoon toasted sesame seeds
Directions
Make the dough:
- Combine the warm water, sugar, dry yeast, salt, and the vegetable oil in a large bowl and mix well until the dry yeast is fully dissolved.
- Add the flour and mix it with a wooden spoon for 1 minutes and then knead it for 2-3 minutes by hand.


- Cover and set aside in warm place until the dough doubles in size.
*tip: watch the video to see how you can make your dough rise faster!


- Knead it again for 1 minute to remove any extra gas and the dough turns smooth. Cover and set aside in warm place for 30 minutes.


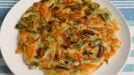
While we wait for this to rise, we can prepare the fillings:
- Place the onion, carrot, zucchini, green onion, and white mushroom in a large bowl.

- Add the salt and mix it up by hand. Set aside for 10-15 minutes.
- Squeeze the excess water out.
*tip: using cheesecloth will make this easier. Wrap the vegetables in cheesecloth and gently squeeze the water out.

- Combine ground pork, soy sauce, garlic, sugar, sesame oil, and ground black pepper. Mix it by hand and set aside.


Let’s cook!
- Heat a large pan over medium high heat. Add 1 tablespoon vegetable oil and sauté the chopped vegetables for 2-3 minutes. Transfer them to a large bowl.


- Heat up the pan again, and cook the seasoned pork for 3 minutes until fully cooked.

- Put the pork into the bowl with the vegetables and mix it all up.


Now let’s make the buns:
- Split the dough into 16 smaller pieces.
- Take a few dough balls and put them on a floured cutting board. The rest of balls should be in the bowl with the lid closed, to prevent them from getting dried out.
- Roll out each ball into a disk 4 inches (10 cm) in diameter.

- Place a disk into your palm and add 2-3 tbs of filling mixture to the center of it.


- Lift the edges of the disk up around the filling, then press the edges together to seal the filling snugly inside the bun.

- Repeat with the remaining dough and filling, until you’ve made 16 buns.
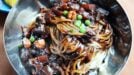
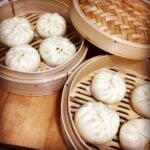
- Put 6-7 cups of water in the bottom of a large steamer and place each bun on the rack.

*tip: Place cheesecloth or cotton cloth on the steamer rack before adding each bun. Baking cups also work well. When you place the buns on the rack, leave a 1 inch gap between them because they will get bigger when steamed. - Wait for 20 more minutes to let the dough rise even more.
- Bring to a boil over high heat, and steam for 20 minutes.
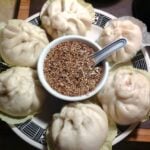
Make Dipping sauce:
- Combine soy sauce, vinegar, sugar in a small bowl. Add the onion, green chili pepper, sesame seeds, and mix it well with a spoon.


Serve with the dipping sauce, and enjoy!


Maangchi's Amazon picks for this recipe
It's always best to buy Korean items at your local Korean grocery store, but I know that's not always possible so I chose these products on Amazon that are good quality. See more about how these items were chosen.


![[OTTOGI] Premium Roasted Sesam...](https://m.media-amazon.com/images/I/41DixbNS9AL._SL160_.jpg)


I will have to try your recipe out. I’ve spent the last 3 years making various steamed bun recipes with all sorts of different fillings! I love steamed buns because of how versatile you can be with the filling. My most popular request I get is for BBQ Pork, simple and really yummy :)
Maangchi noona!! Annyeonghaseyo?? I love to read your blog for the techniques. I live in Brazil and a lot of the ingredients are unavailable, but your techniques are so solid! I made these dumplings and I have some tips for your readers:
1. Don’t try to roll the dough too thin. When the dumplings rise for the last time, the yeast bubbles will compromise the dough and they become like wet paper bags. If you can, keep the dough in the center of the circle (the bottom) thick, and the edges (the top) thin. Then you will have nice, even buns.
2. Get as much water out of the filling as you can. Either cook it out, or if you have a vegetarian filling (in my case), *wait*. If you don’t, and you have a small steamer and you have to steam in batches (in my case), the water will inundate the bottom of the bun, and again, wet paper bag. Yeast is a living thing and if you don’t respect it, you get soggy buns. :)
3. Don’t be lazy making the sauce. These have a high bread-tp-filling ratio and they need to be seasoned after they’re cooked. That’s what the sauce is for.
My wife loves you, maangchi!! Fighting!
Maaangchi – tae dan hi kamsah hamnidah! This is an awesome recipe. My Yobbo (nampyon) just made these. MAYOO MASHESAYO! YUM!!!!!!! Great to eat any time of the day or night. I even take them to work for my mid-morning snack and heat them in the microwave very briefly.
Hi, I just wondering Can I use my bamboo steam for the steam buns??
I make buns all the time, and I use a bamboo steamer. They come out just the same!
Hi Maangchi!
Thank you so much for sharing this lovely recipe – I made these for the first time today but unfortunately they did not turn out as great :(. The dough became a dull yellow/grey brown colour after steaming and was really hard to knead. I followed your recipe except I used plain flour (no all purpose flour here in the UK) and olive oil. Am I doing something wrong?
You got the right flour because plain flour is all purpose flour. I think the dough didn’t rise properly. Check out your yeast to see if it’s still active or not. And when you mix the yeast with water, the temperature of the water shouldn’t be too high. Less than 30 celsius.
the water has to be hot or have to be boiled????
boiling!
These taste great with ground Turkey as well. I added a tablespoon of Worchestershire Sauce along with the soy sauce and whatever to season it just because I could <3 The only other ingredient alternations I made was using bamboo salt instead of normal salt and I used less because my father has high blood pressure, so there were no juices to drain out. I would like to say that having an electronic steamer (that my mom bought on a whim) made it a lot easier. The only problem was that it was not round but a bit flatish… but that may be because I tried to steam too much of it at once.
The little girl I tutor loved it. She ate nine in one sitting and wouldn't share with her brothers and father. I've gotten multiple comments that it was very clean and healthy tasting unlike store brands. This is the first recipe that I've tried from your website and will be trying more (since I'm trying to cook more Korean foods)
Hi Maangchi! Thank you so much for putting this recipe up, my family loves it! I’ve made them multiple times already. Tomorrow I’m planning to make a triple batch, Instead of putting all the veggies in the bun I leave them to the side. They are so delicious! Thank you !
Hi Maangchi! Just wanted to let you know that I love every recipe you put on the site! I’m planning on doing them all! lol But I just wanted to know where you bought your steamer or maybe you could tell me what brand it is … By the way are there any kitchen tools that you recommend?? Which ones are a must have??? Merry x-mas Maangchi Take care!!
Hi Maangchi!
I made these twice and both times my buns grew cute and big in the steamer and then after I opened the lid, rough hard yellowish spots appear on the surface of the buns. Looked like my buns had yellow rashes. I have the same steamer as yours except my lid is glass so I can see what’s in there. I followed your directions to leave one inch gap between each bun and away from e sides of the steamer. :( I tried googling what’s wrong and I came across people saying to prevent blemishes, open the lid quickly to prevent water droplets from dripping onto the buns. I did that, had blemishes. and I even cover the lid with a cloth to collect all the water droplets for one batch, didn’t work. I placed dry cloth on the buns another batch and they still have blemishes. So I tried placing a parchment paper on top of the buns and also wrap a cloth around the lid. Still the same. Any idea what’s wrong? :(
I really want to make the good looking buns on top of them tasting great. If not I will be the only one eating these delicious babies :(
You really work so hard to make nice steamed buns!
But I’m afraid to say I’m not sure what is going wrong, and it’s hard for me to tell what the problem is when I can’t see them. It sounds like you did everything right here.
If I were you, I would try cooking for a shorter time. It’s possible that your stove is hotter than mine and they are cooking too hot.
Give it a try. I hope you can solve the problem!
The yellow “rashes” may be from undissolved yeast. Make sure when you are dissolving your yeast, to stir it for a bit very gently, and then let it sit to make sure all the yeast is dissolved.
I have learned on the ‘net that the yellow spots are caused by water dropping on to the dumplings during steaming. Traditional steamers do not have this problem. A suggestion would be to place a teatowel inside the lid of your steamer.
I am looking for a recipe to make the steamed buns with whole wheat flour. I started buying these two weeks ago and love them but I try to keep my white flour intake down. If they come out good, I will share with everyone.
Hi maangch! Ur website is v.useful for me.. Thanks alot …
About steamed bun … If i replace the pork with beef… Is that making a big different in the taste?
And sorry for my bad english language>_<
Yes, you can replace pork with beef. It will turn out very delicious.
I just made these today, and they’re so good! My brother doesn’t usually like vegetables, and he really hates onions, but he’s raving about these. A huge success! I added 2 ounces more of pork than you used (so 16 instead of 14) but it wasn’t that big a difference, and all the flavor is still there
“A huge success!” : ) Great news!
I made these yesterday, they were a huge success! I couldn’t leave the house to go to the store, so I used a different filling… I used chicken, ginger, chinese cabbage, mushrooms, a little onion and sweet spring cabbage. Maybe not very authentic but tasted great~~ I didn’t have a big steamer so I could only do 4 buns at a time. I kept the rest in the fridge (I had 4 steaming racks) and took them out in time so that they rose while the previous batch was cooking. My buns turned out fluffy and delicious. :) Thank you for the recipe! I want to make these again soon.
Thank you very much for sharing your cooking experience with us! “I could only do 4 buns at a time..” wow, lots of work! I’m very impressed with your passion for cooking!
Cheers!
Maangchi! I did the steamed buns this morning, it was very good result:) thank you for your useful recipe.
Great, I’m happy for you!
Hi Maangchi!
I’m allergic to wheat, would it work if I used rice flour?
Thank you :)
I would like to know to, Im allergic to wheat too. Thought maybe a sweet rice bun would do the trick. Let me know if you experiment with this!! Thanks!!
Today my mother made this (she had some chicken filling left over) and the dough was perfect! She thinks you’re so funny – we’ll be keeping an eye out for your videos ;)
Thanks a lot! You mom must be a good cook! Steamed pork bun (jjinppangmandu) is not easy to make for a beginner cook.
Hey, Maangchi! It’s interestsarefree from Flickr. I’m not on there anymore. I decided to be here exclusively.
I made hobakjuk for last year’s Thanksgiving. This year, I made these! I got thirteen of them out of this recipe. I’ll upload a picture soon. My family loved them, especially my mom.
We both love steamed buns, but she prefers chapssalddeok as she loves sweet bean paste, known in Peru as frijol colado, except cloves and evaporated milk are added to it.
I would apply for a visit to Peru for Gapshida!, but I live in New York. Love your recipes anyway!
Go Maangchi!
wow, welcome to my website! I’m glad to hear that your 13 babies came out delicious! : )
Ms. Maangchi, can you substitute white flour for whole wheat flour?
Yes, sure. Some of my readers did this already and it turned out great!
Cool!… Also, I see that you are very involved in communicating with your followers. Thank you so much for that. You really put a lot of effort and care into helping us.
similar to a filipino dish called siopao… i want to do this… i love this dish perfect for snack and perfect for picnic get outs… or potluck and it can be eaten all the way to the road… i hope i can make this through using ground chicken or beef… for vegetarian i guess its tofu…
I made this for my family today, and my husband couldn’t stop eating it. It takes time to prepare but time flew by quick. thank you maangchi :).
I’m going to learn how to make these so I can carry on eating them when I leave Korea. All the local stalls here have glass noodles in their mandu. One of the stalls includes vegetables in the dough which makes them look really pretty. Most stalls also sell a sweet version using red bean paste which I like.
Maangchi! I love your cooking! I want to freeze the bun, sould I freeze it before I steam or after? Thanks maangchi!
I just discovered your videos on YouTube tonight while looking for recipes for pork buns. You are wonderful and your vids are very straight forward and thorough.
Could you use doejibulgogi for filling in the steamed buns? Or do you have another bbq pork recipe that would work as a filling?
your recipe is all good and yummmmmmmy…….my family loves it…
thank you maangchi
If you make good steamed pork buns, I consider you are good at cooking!
man this recipe looks delicious with a capital D i must try this next week when my steamer is here it will be its first job!
one question though can we add tofu in there i just love tofu and i was just wondering about it to see if i could i mean its your recipe!!!!
Thank you so much for this recipe!
I made these buns today and my whole family loved them! Even my dad did, and he doesn’t really like Asian cooking!
I only made half of this recipe because we are a small family (I’m only a 17 year old boy) and I gave the extra ones to some relatives and they called me to tell me how much they liked them!
I’m starting to really like cooking Asian food, and this is definitely going to be a favorite of mine! So thank you again, Maangchi!
wow, it sounds like your steamed pork buns were a big hit! Congratulations!
I LOVE this recipe!!! It’s not very hard to make, just takes a bit of time for the dough to rise, but i did use your warm water trick. I had a hard time at first filling and sealing the buns but I got the hang of it. They steamed beautifully. I also made the sauce and it goes PERFECT with these buns!!! I will be making this recipe A LOT! Thanks so much for all the the great recipes.
Good news! Making steamed pork buns is not very easy for a beginner cook. It sounds like you are good at cooking! Happy cooking!
Hi Maangchi!
I saw u make a video of the just the pork and veg mandu. I was wondering if you can tell me how to make kogi mandu with the noodle.
YUM! Did she provide you with a kogi and noodle version (kind of like with the chapchae noodle)?
I just made these ^^ I must say they turned out quite well. Thanks for this recipe :)
I substituted the pork with vegetarian ground “beef” turned out really well ^-^
hmm vegetarian ground beef sounds very interesting! Where can you buy it?
A lot of grocery store have it in the section where you find tofu and stuff
Hello Maangchi,
Thank you so much for simple recipe for skin of bun . I make it today and it turn out really good .
Great news!
Hi Maangchi!!
I made this buns last Sunday for breakfast for my boyfriend and two friends!!!
Amazing!!! they said that I’m the master of “pancitos chinos” (little Chinese buns in Spanish)
I’ll do it again this weekend!!
Thank you very much for share all your recipes!!
Pd: They made Bibimbap at midnight with the leftover filling!!!
Hi master of Pancitos Chinos! : ) Cheers!
Hi Maangchi,
I would like to ask if this dough recipe can be use as Chinese Fried Baozi.
I don’t know the answer but you can leave your question on the forum. Happy cooking!
https://www.maangchi.com/talk/forum/general-discussion
hi maangchi! my mom makes really yummy red bean jjimppang. would this dough recipe work well with red bean paste too?
Yes, it will work perfectly! I will post the recipe someday!
Dear Maangchi
We’ve tried a lot of your recipes by now and I was very excited to see this one. We actually do make similar buns at home( our family is koreans from Central Asia, Kazakhstan) I’ve been looking for a similar recipe in Korean cuisine because at home my grandmother used to make the steamed buns and I thought that the recipe was genuinely Korean, however I guess it originated from Chinese cuisine ^^
Koreans in Central asia have somewhat different recipes for their traditional food ( that includes other diaspors besides Uzbek Koreans, and probably some part of Koreans in Russia). The reason to it is probably that our ancestors were from northern part of Korea and some of them spent lives in China
In our family recipe we use ground meat, cabbage and chives for the filling and — which is a family secret– a portion of soy bean paste. Soy bean paste makes the meat more flavoured, yummi ^_^ And yes we also freeze the buns– in the freezer
“..In our family recipe we use ground meat, cabbage and chives for the filling and — which is a family secret– a portion of soy bean paste”
Thank you for revealing your family secret filling recipe! ^^