


Today I’m going to show you how to make makgeolli, a traditional Korean alcoholic beverage made by combining rice, yeast, and water with a starter culture called nuruk. It’s milky-white, fizzy and refreshing. It’s also called “nongju” which means “farmer liquor” because it’s made with a lot of rice, it’s full of carbohydrates and was traditionally served to farmers as part of a midmorning snack or with lunch, giving them the strength and energy to work the rest of the day.
Korea has a long history of homebrewing, and every family used to make their own booze at home, it was much more common than buying it. These days you can buy makgeolli easily at a Korean grocery store or liquor store but when it comes to taste, it can’t be compared to homemade makgeolli. Homemade makgeolli is thicker, less sweet, and more filling than store sold makgeolli.
This recipe is also in my cookbook, Real Korean Cooking, and while developing the recipe I sent a sample of the finished product to the EMSL Analytical food lab for a full nutritional and toxic analysis to see what is really inside it. They let me know that it is totally safe to drink, 7.4% alcohol by volume, cholesterol-free, fat-free, and contains vitamin B1, B2, B3, B5, and B6. It’s high in calories and has a lactobacillus count of 375,500 CFU/mL. Lactobacillus is a kind of lactic acid bacteria that’s good for your stomach and digestion and can boost your immune system. It’s also found in yogurt, but in much higher quantities.
So it’s great for giving you energy and is good for your stomach, but the real reason to drink it is it’s so refreshing and delicious! It’s also a great thing to have at a party, and especially when you make it yourself, your family and friends will love to drink it and have a great time doing it. Making good makgeolli is not very difficult, it just takes a little time and there are a few pitfalls to avoid.
I’ve been making makgeolli for special family occasions and my reader meetups for years. Some of you who came to my meetups and tasted my makgeolli have been waiting years for this recipe. Thanks for your patience!
Make some makgeolli and enjoy life! Let me know how it turns out!
Ingredients (Make 4 quarts)
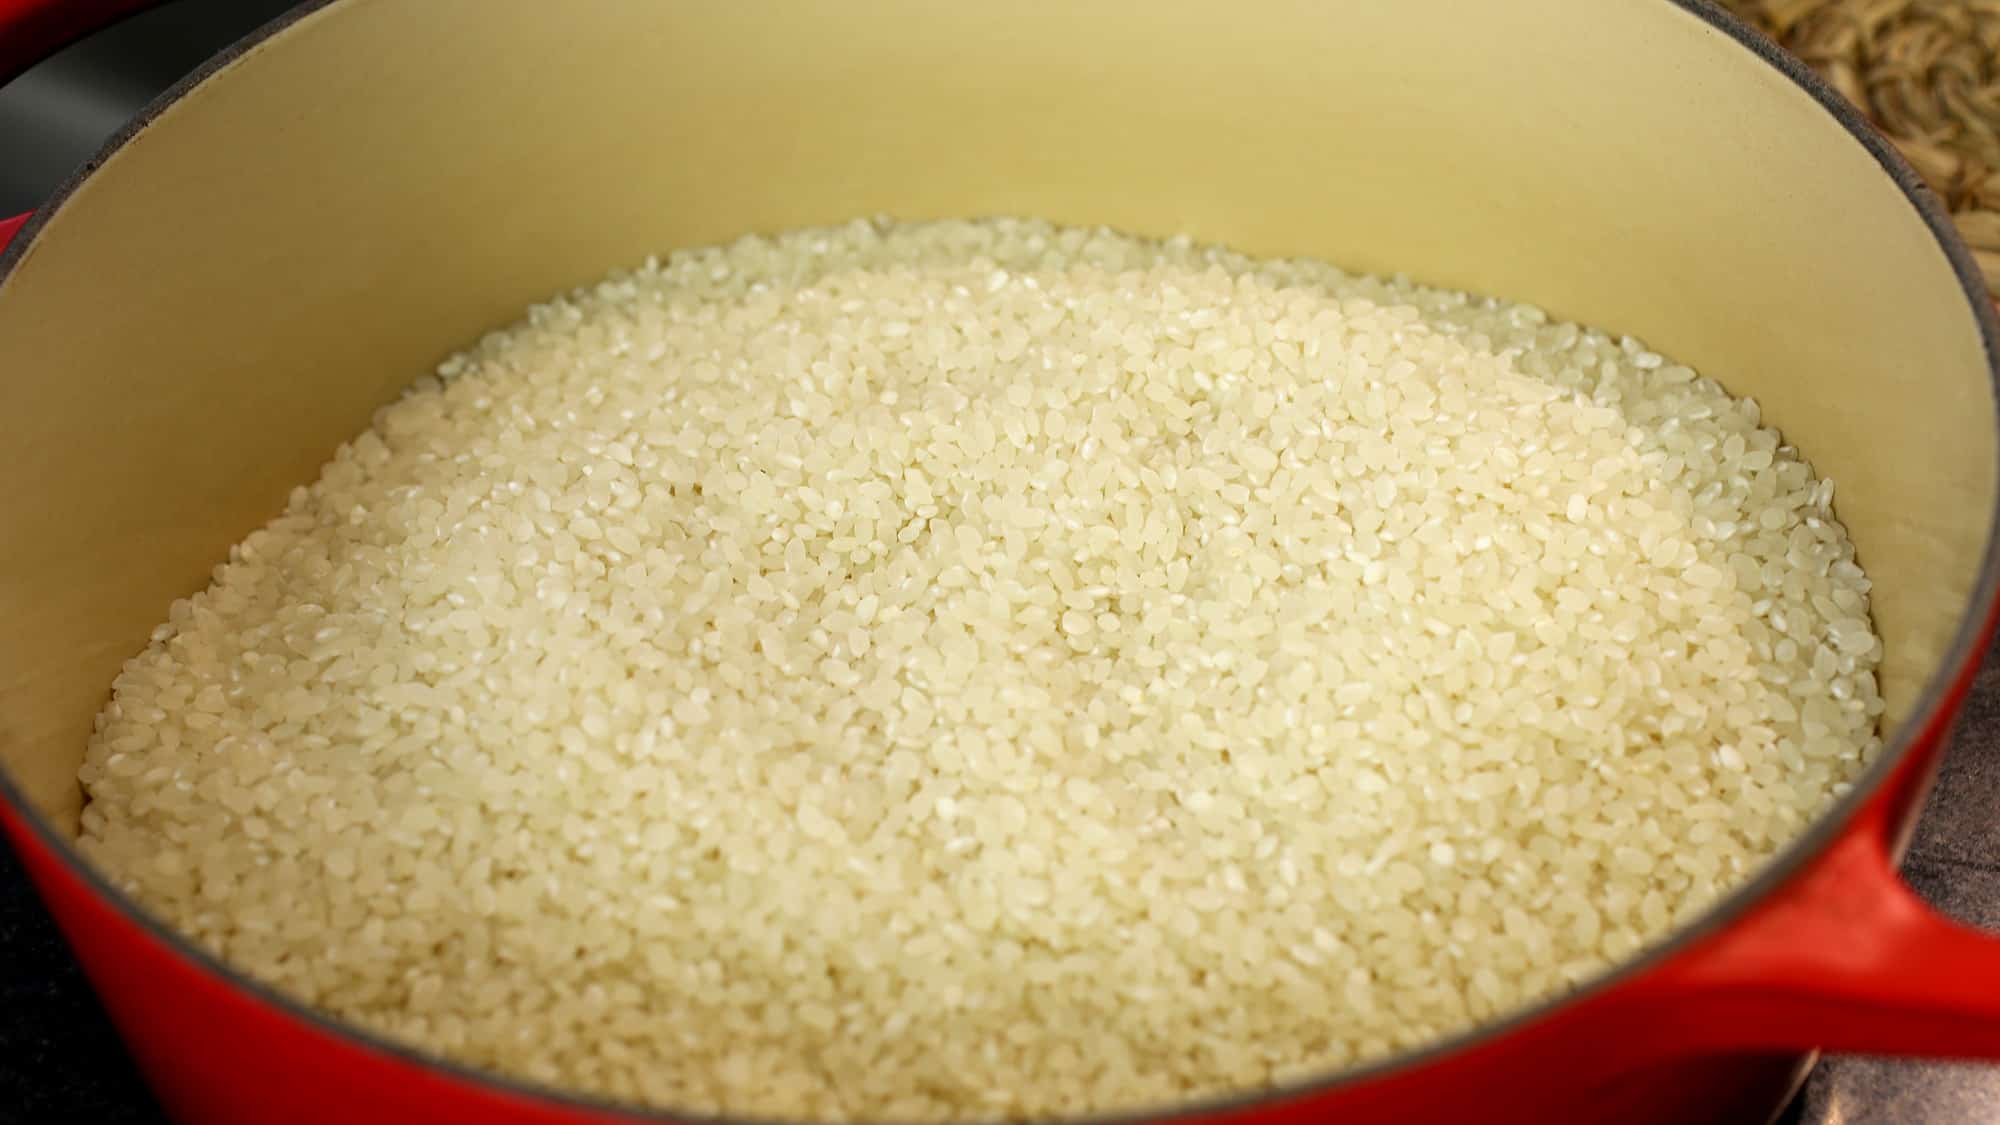
- 5 cups short grain rice, washed and soaked in cold water for at least 2 hours
- 1½ cups nuruk (starter culture)
- 1 package of dry yeast
- 5 quarts of water (20 cups)
- ¼ cup sugar (optional)
 5 cups Korean short grain rice
Special items that I use to make makgeolli
- Electric food dehydrator
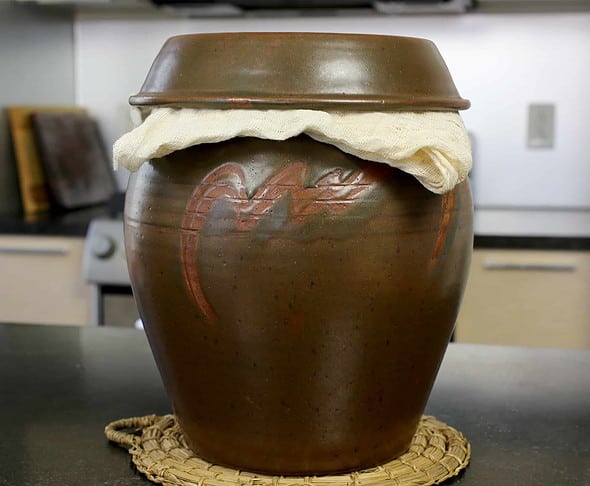
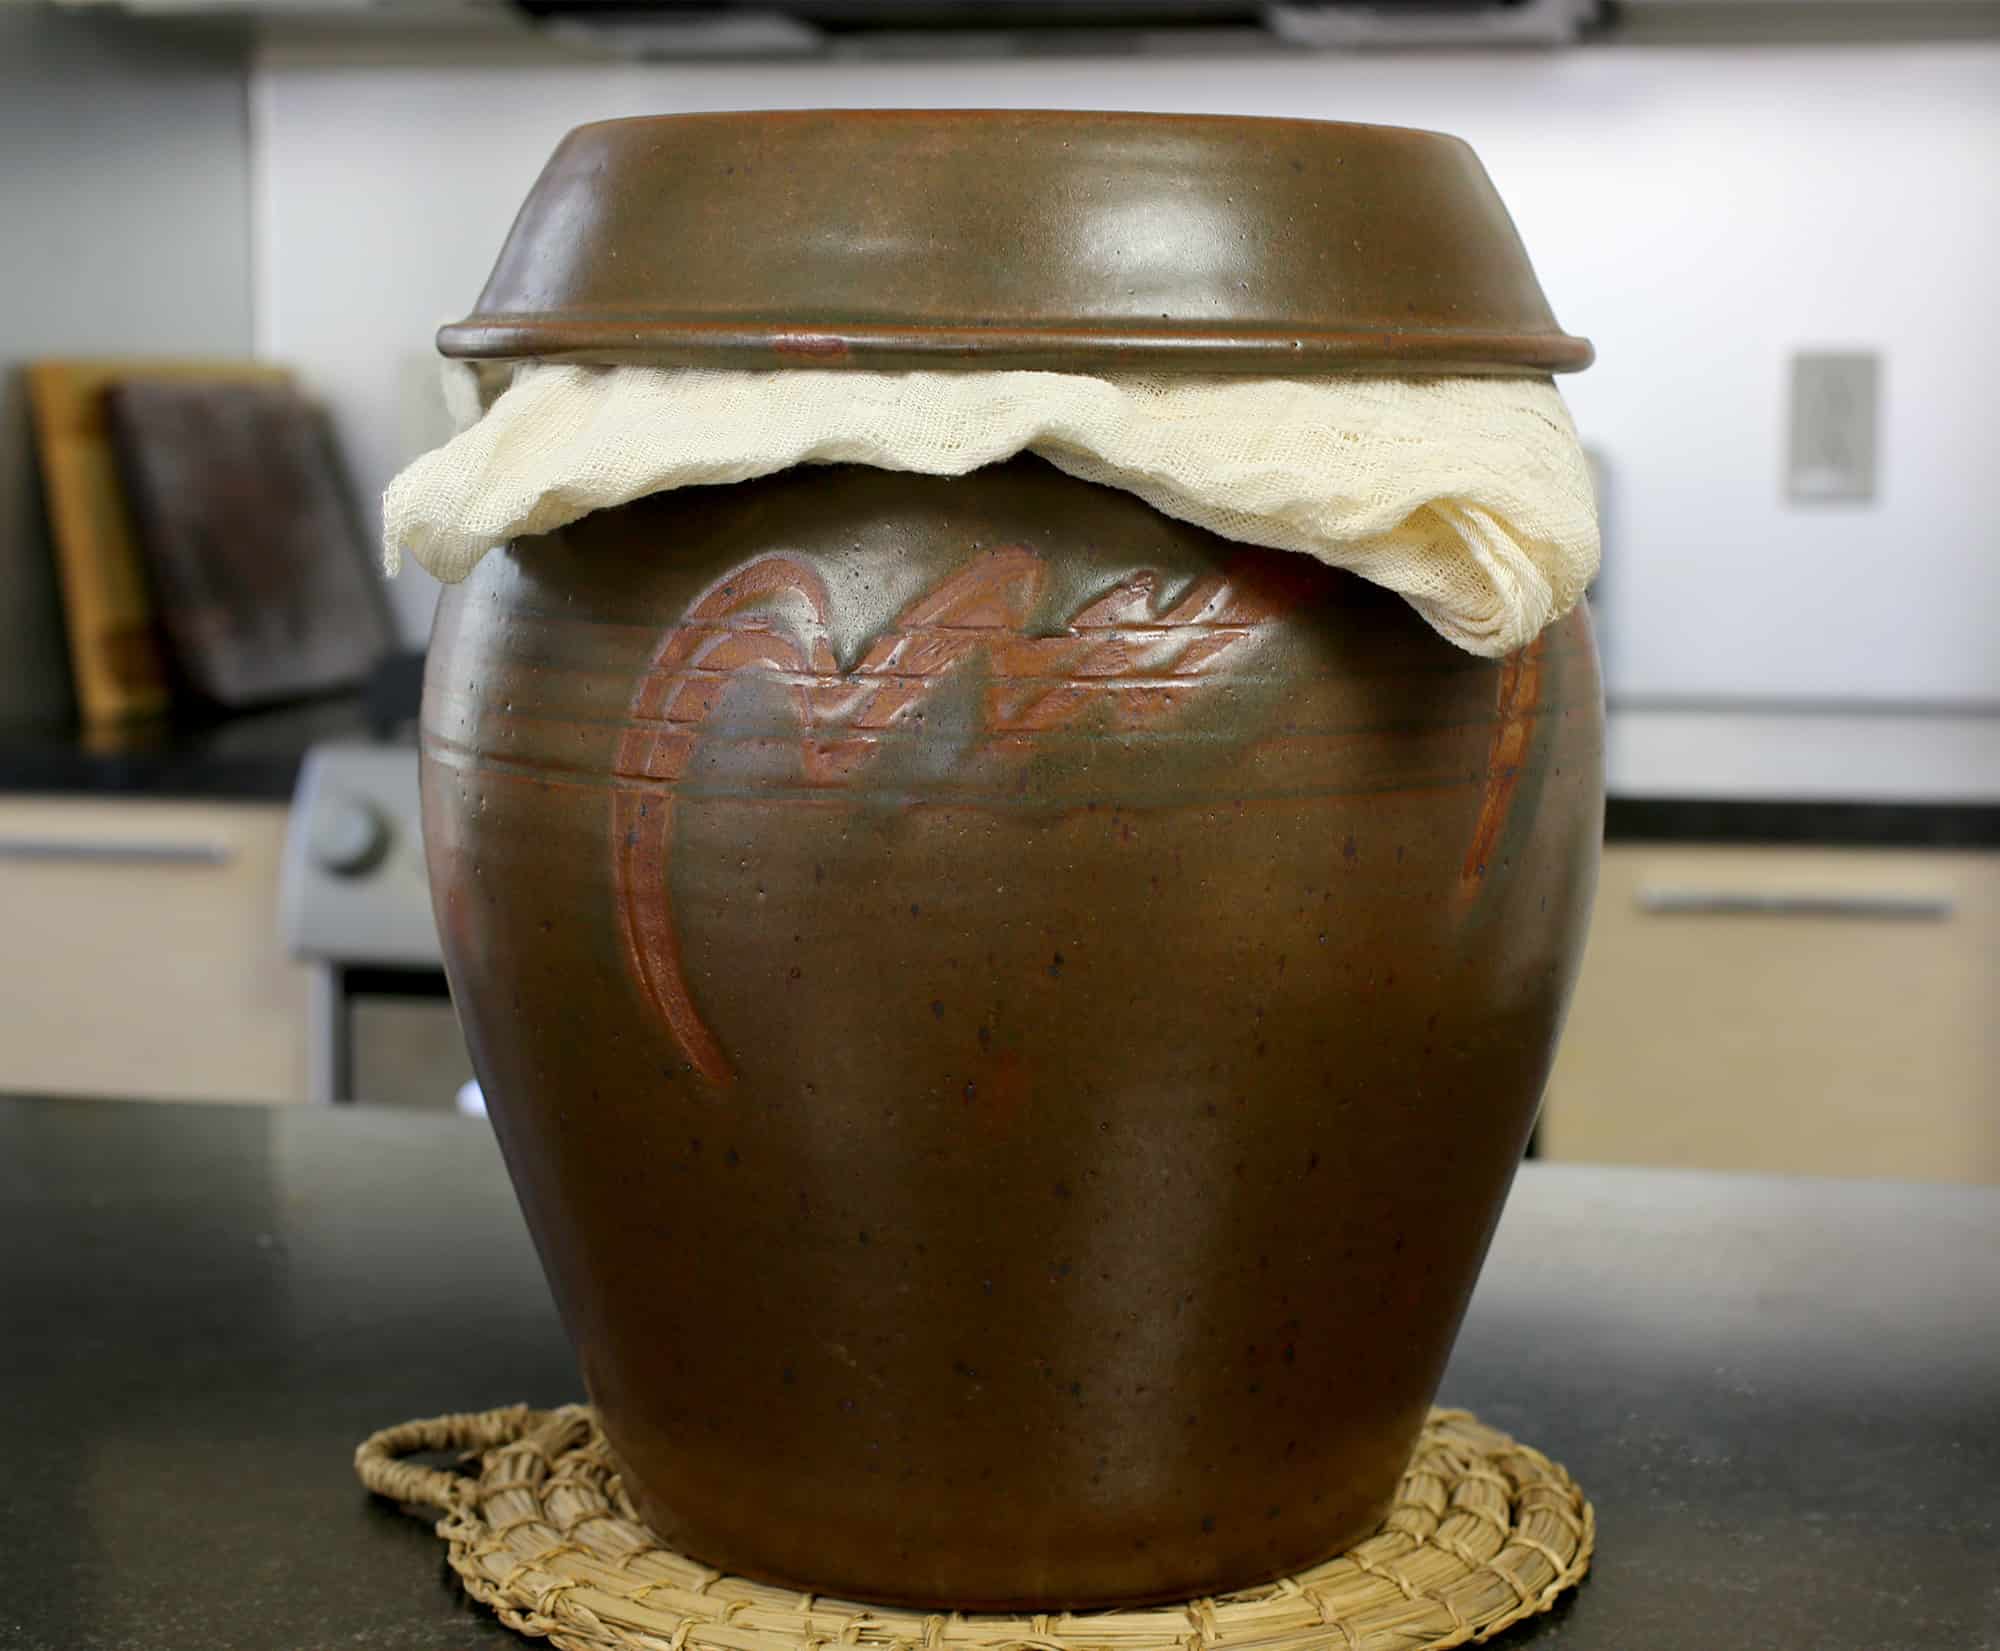
- 7 to 8 quarts earthenware crock
Directions
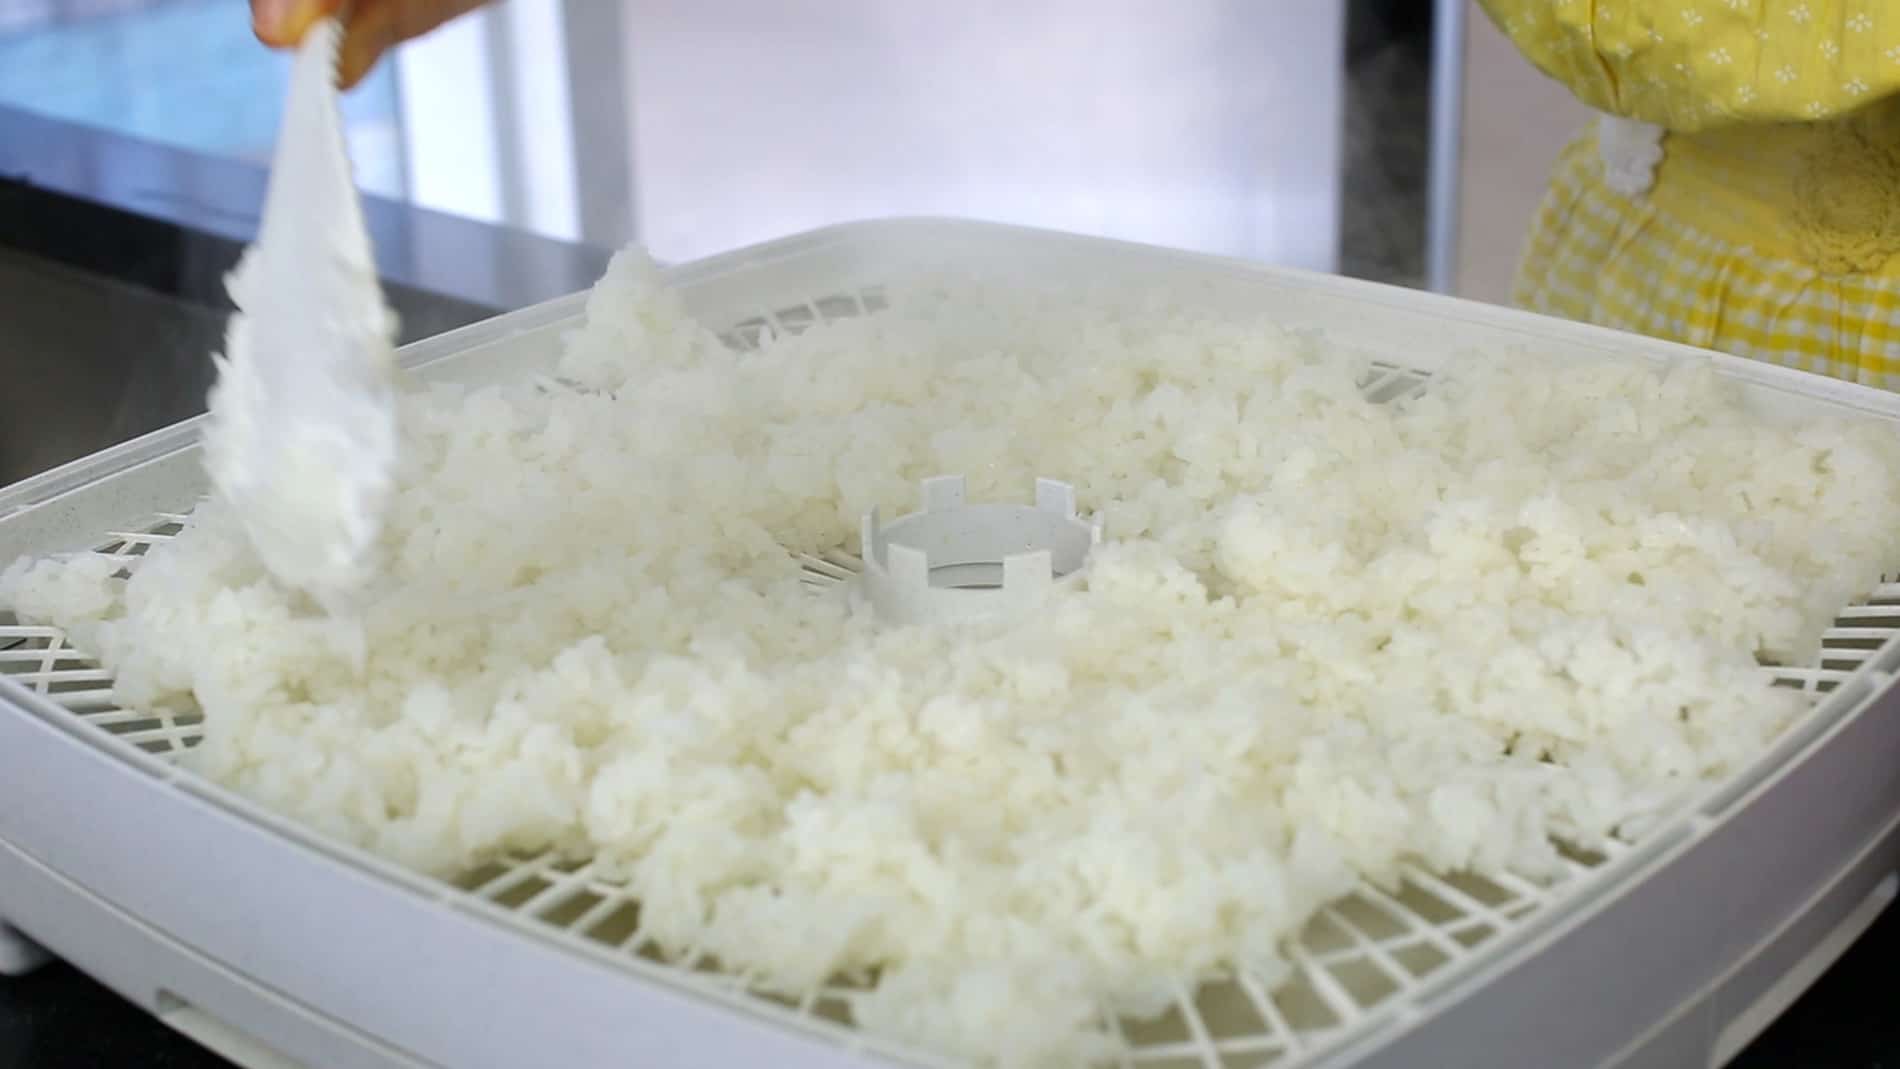
- Drain the rice and put it into a heavy pot. Add 4 cups of water. Cover and cook over medium high heat for 15 minutes. Stir and turn the rice over with a wooden spoon. Cover and simmer it for another 15 minutes over low heat.
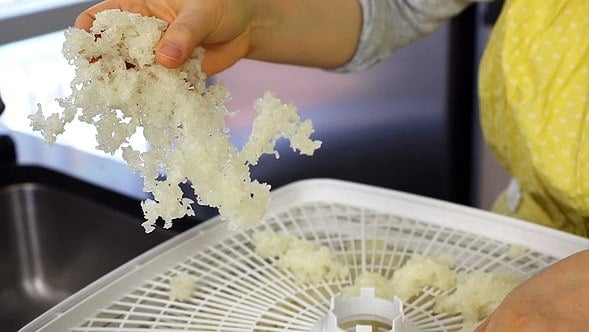
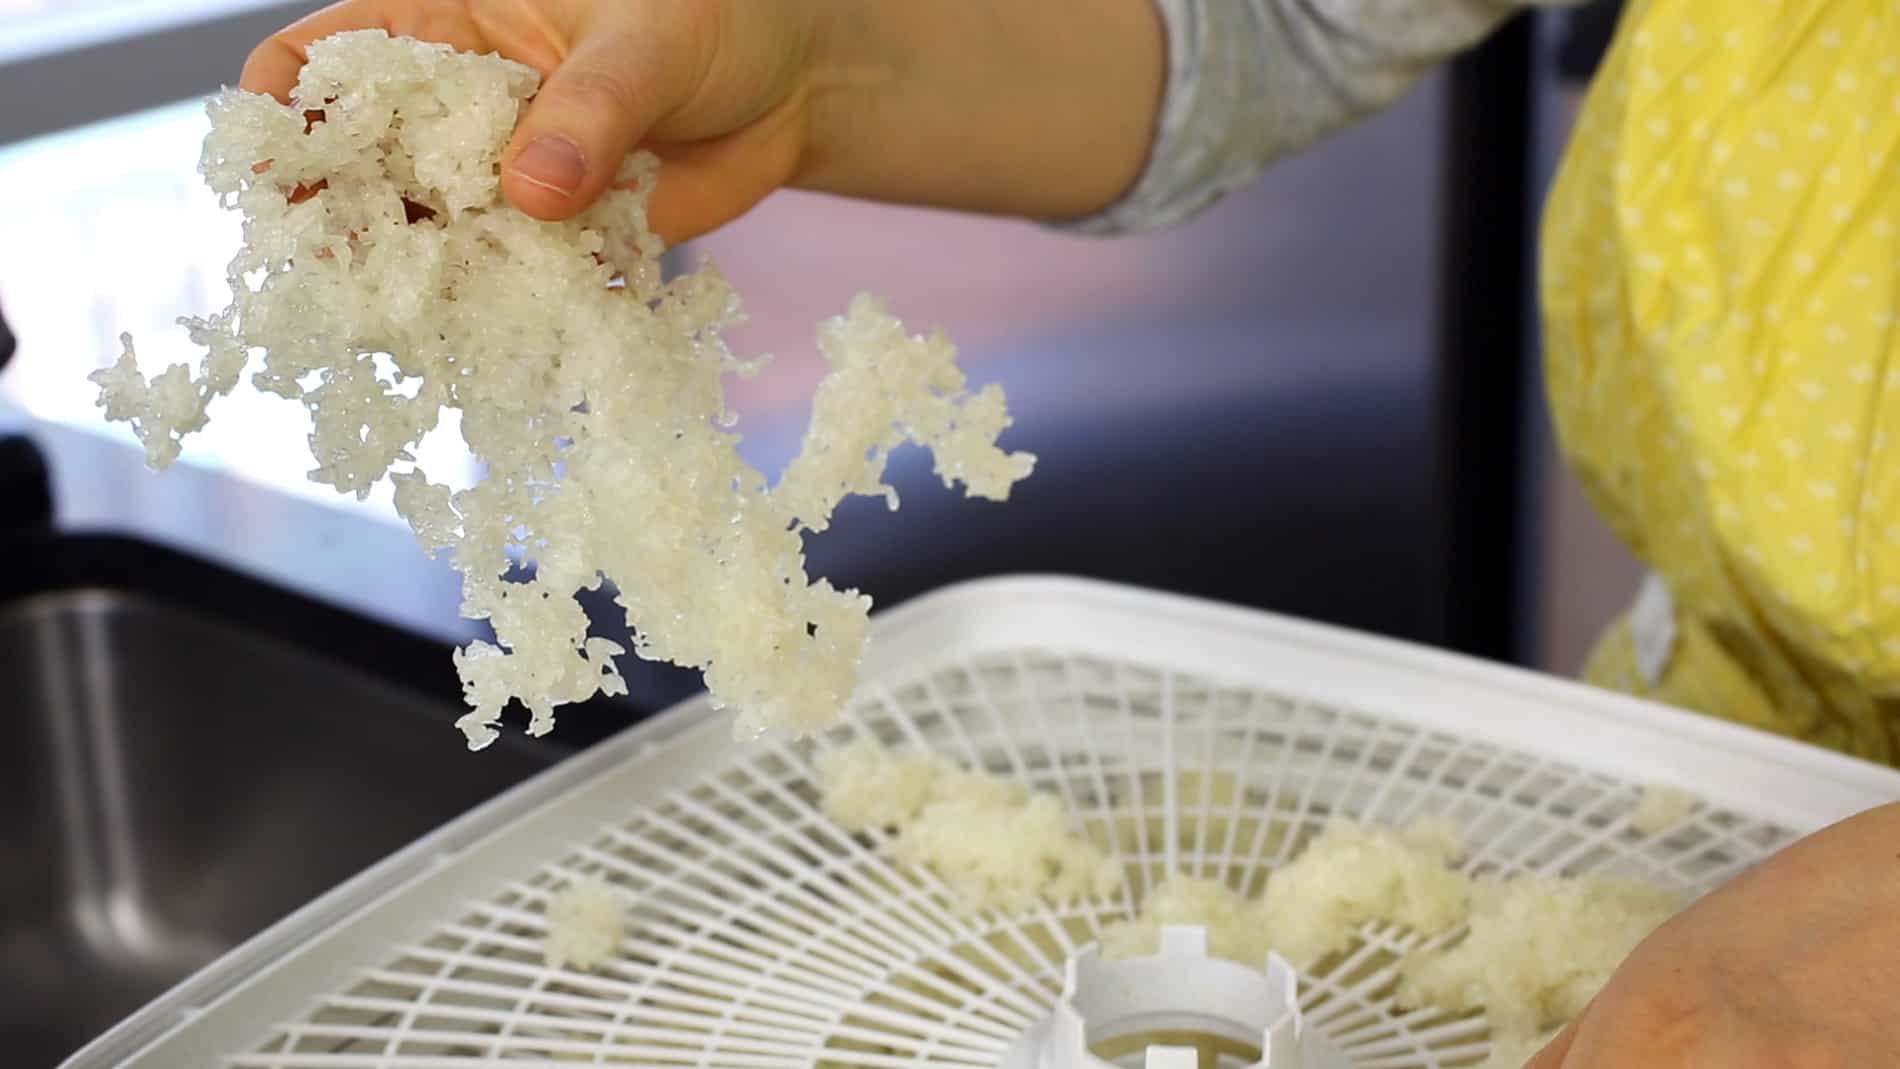
- Remove from the heat. Transfer the rice to a basket of your electric dehydrator. Spread the rice evenly, and fill as many baskets as you need. Cover, set the temperature to 160° F, and dry for 3 hours, until the outside of each grain is hard, but the inside is still moist. If you don’t have an electric dehydrator, you can dry your rice for several hours in a shallow basket set in breezy, sunny place.


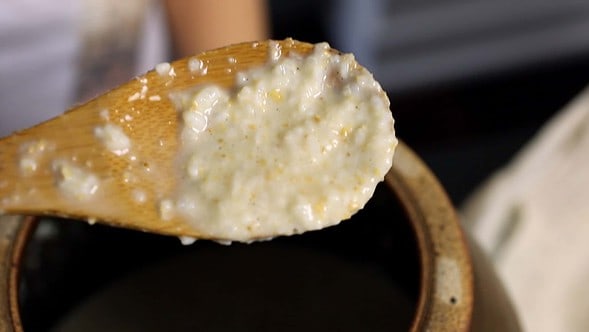
- Put the rice into the earthenware crock. Add nuruk, yeast, and 8 cups of water and mix well with a wooden spoon.
- Place a cotton cloth under the lid when you close it, to let some air circulate in and out.
- Let sit for several hours, then uncover and mix well with a wooden spoon. At this point, the rice will have absorbed a lot of the water to create a thick paste. Cover and let sit overnight.

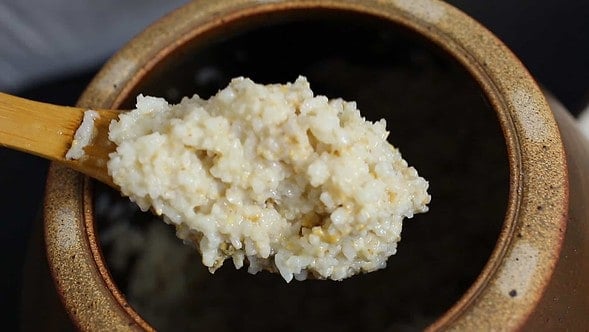
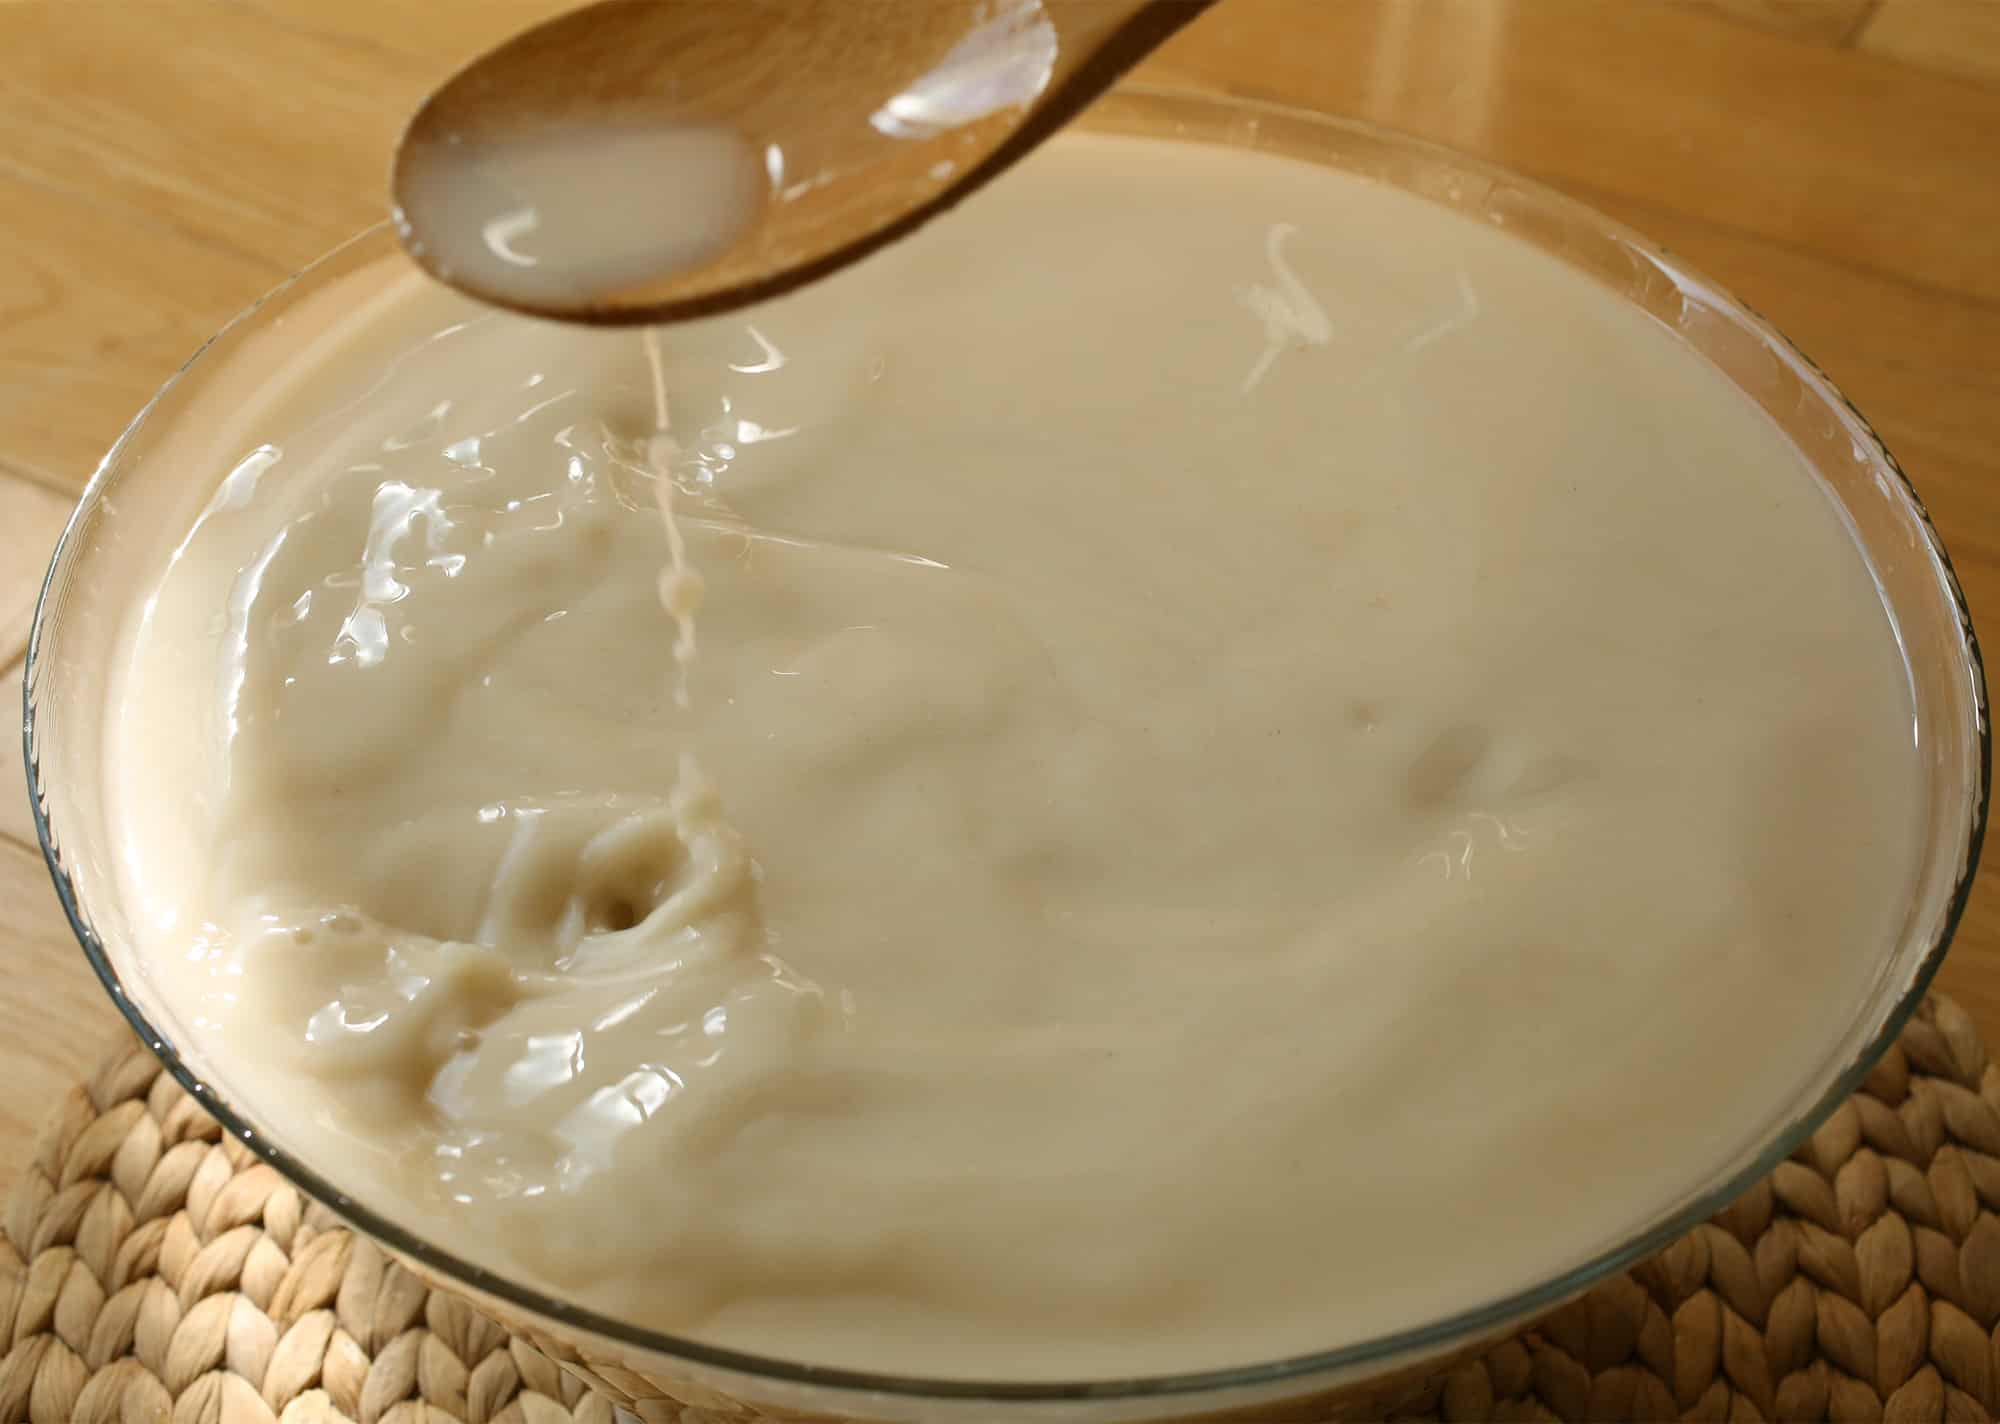
- Open the crock and you’ll see a lot of bubbles popping to the surface, and the mixture will be a lot thinner than yesterday. Stir it well with a wooden spoon and cover again. Stir it a few times a day for the next few days.
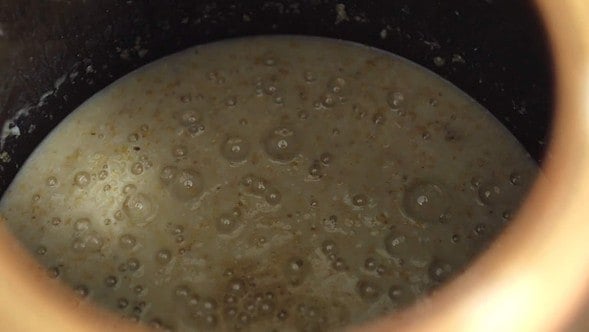
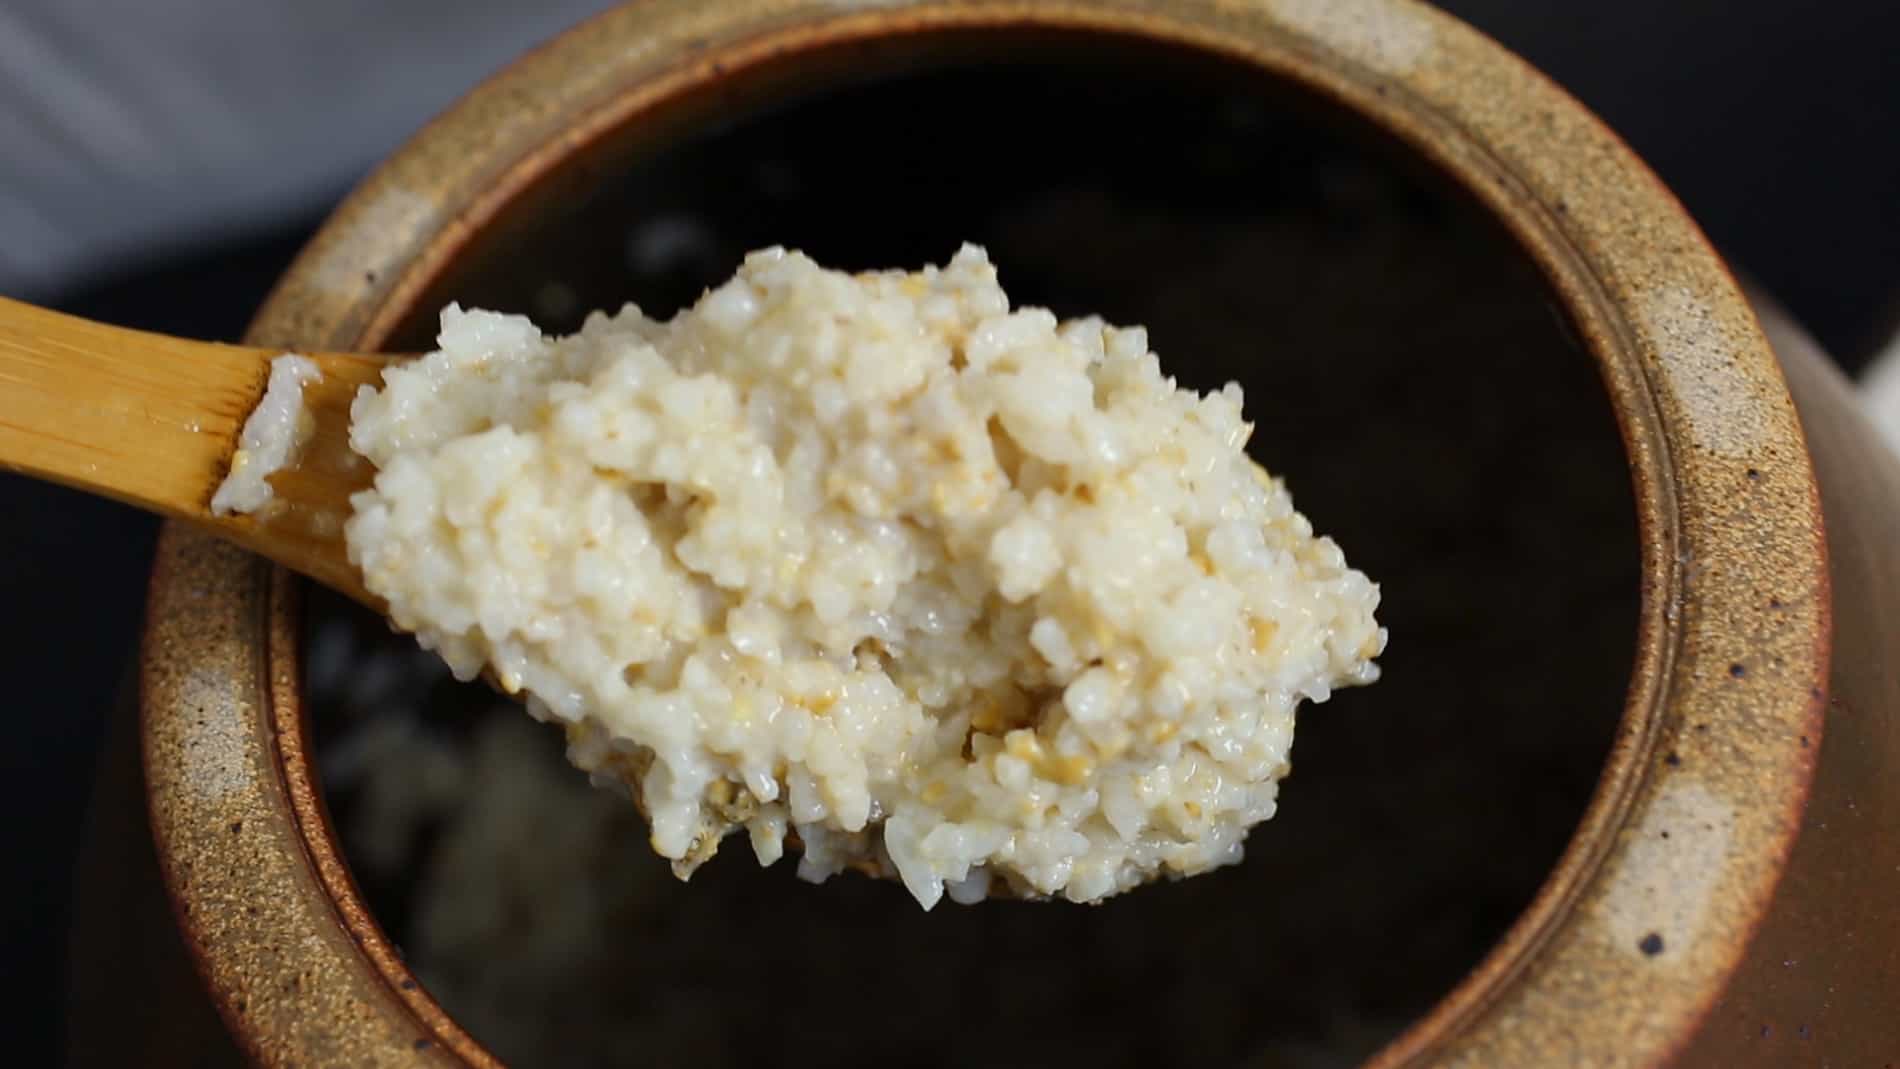
- On day 4 or 5, it will be bubbling a lot less and will have separated to a clear liquid on top and a milky mixture on the bottom. Mix well, and keep mixing a few times a day for a few more days.


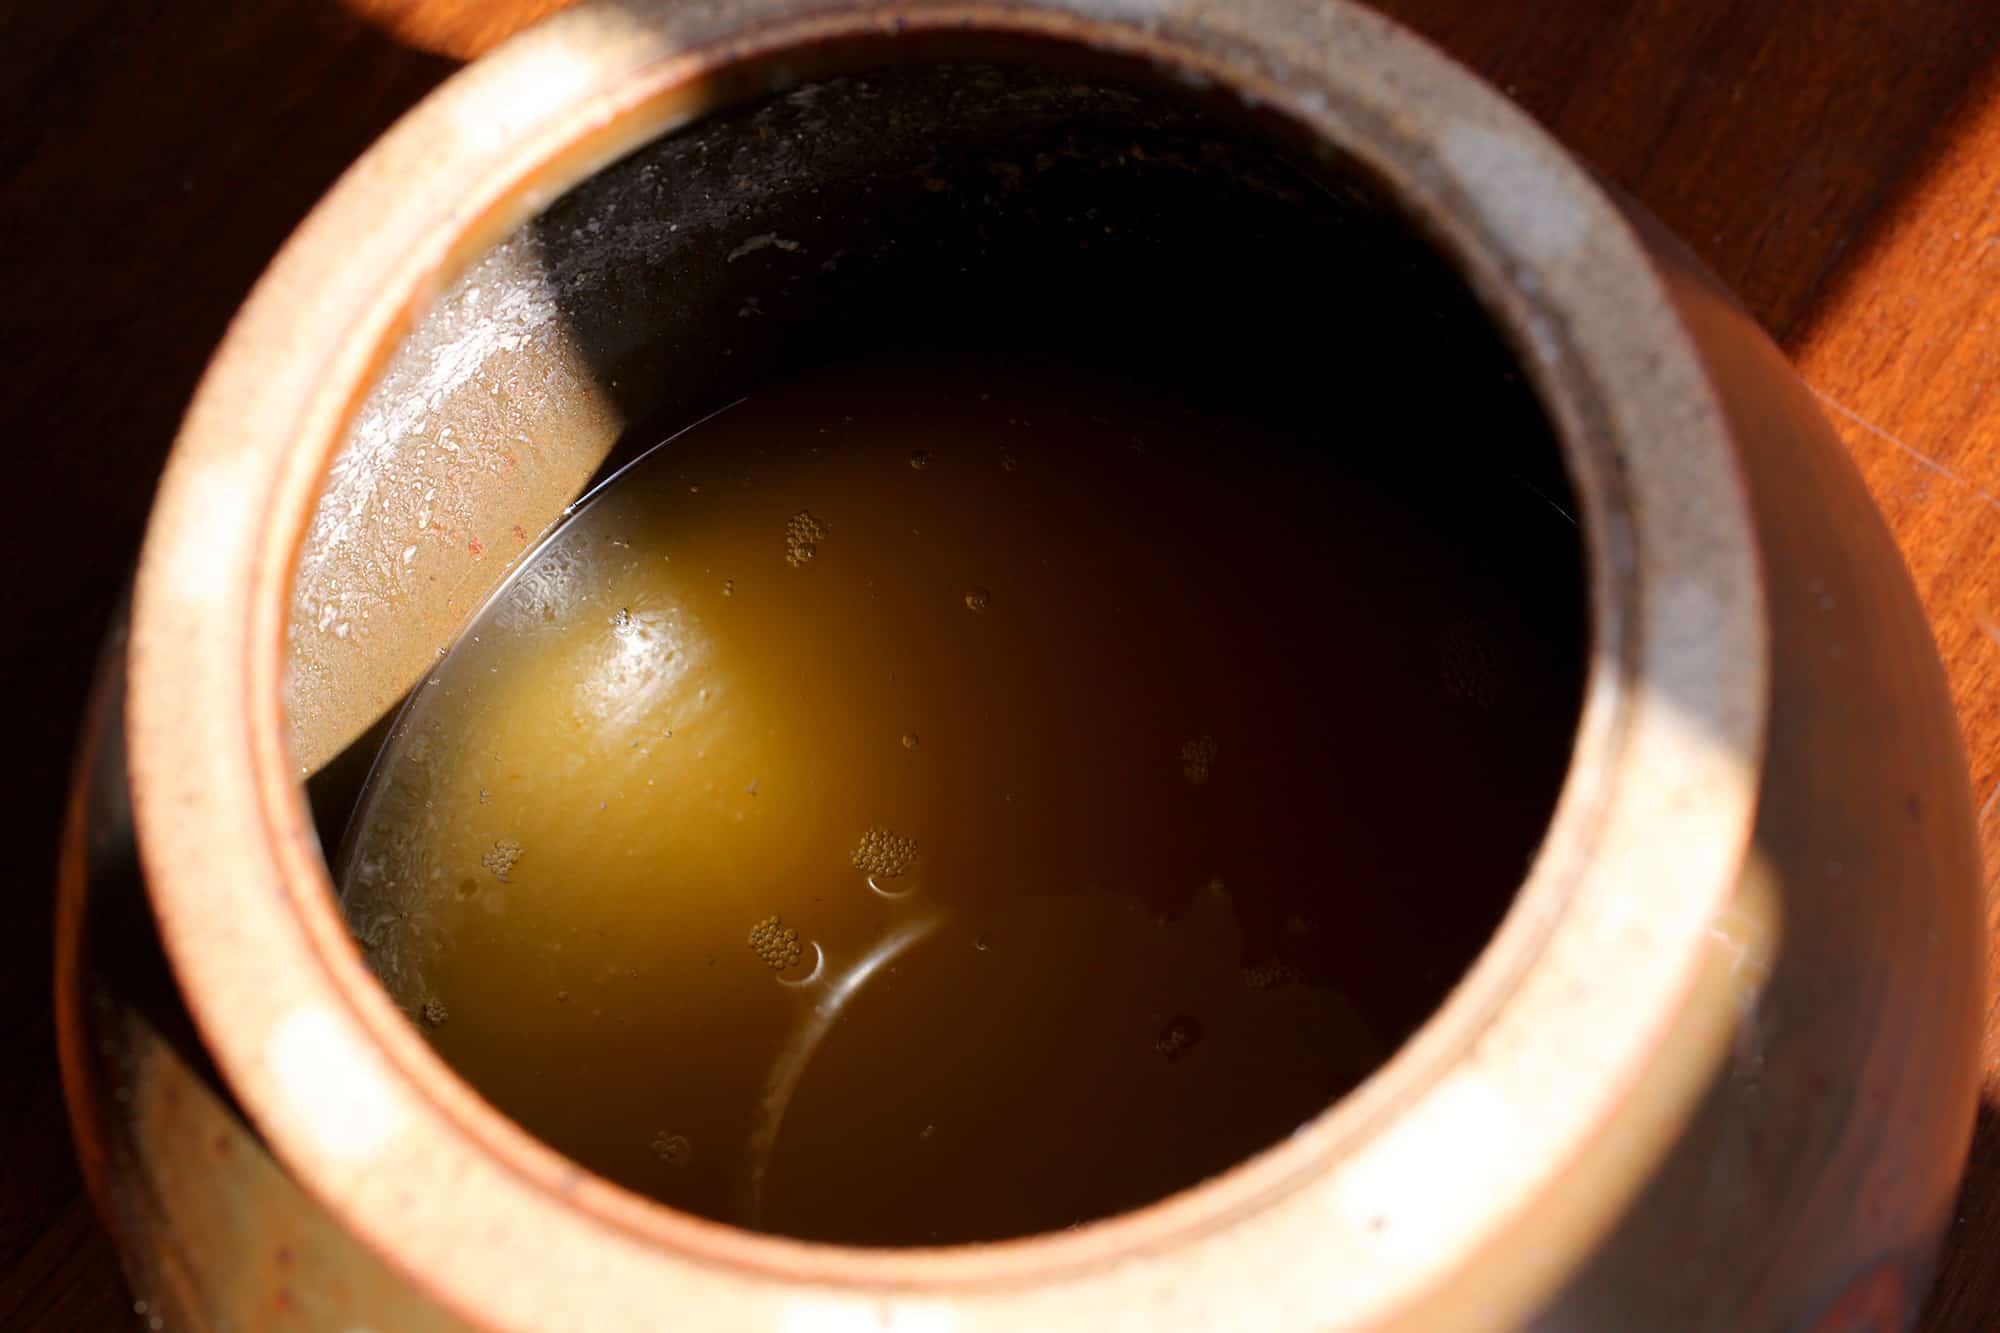
- On day 8 or 9, there will hardly be any bubbles at all. The liquid on the top will be clearer and more amber. It’s now perfectly fermented and ready to drink.
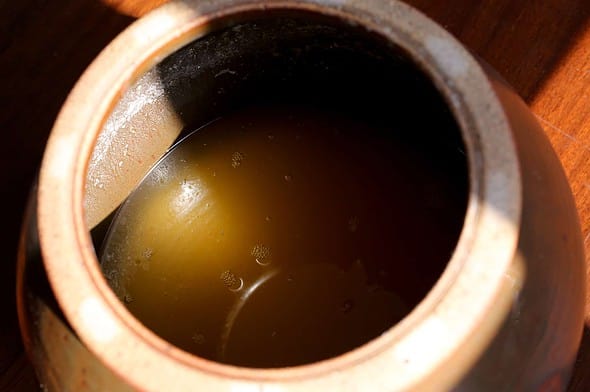

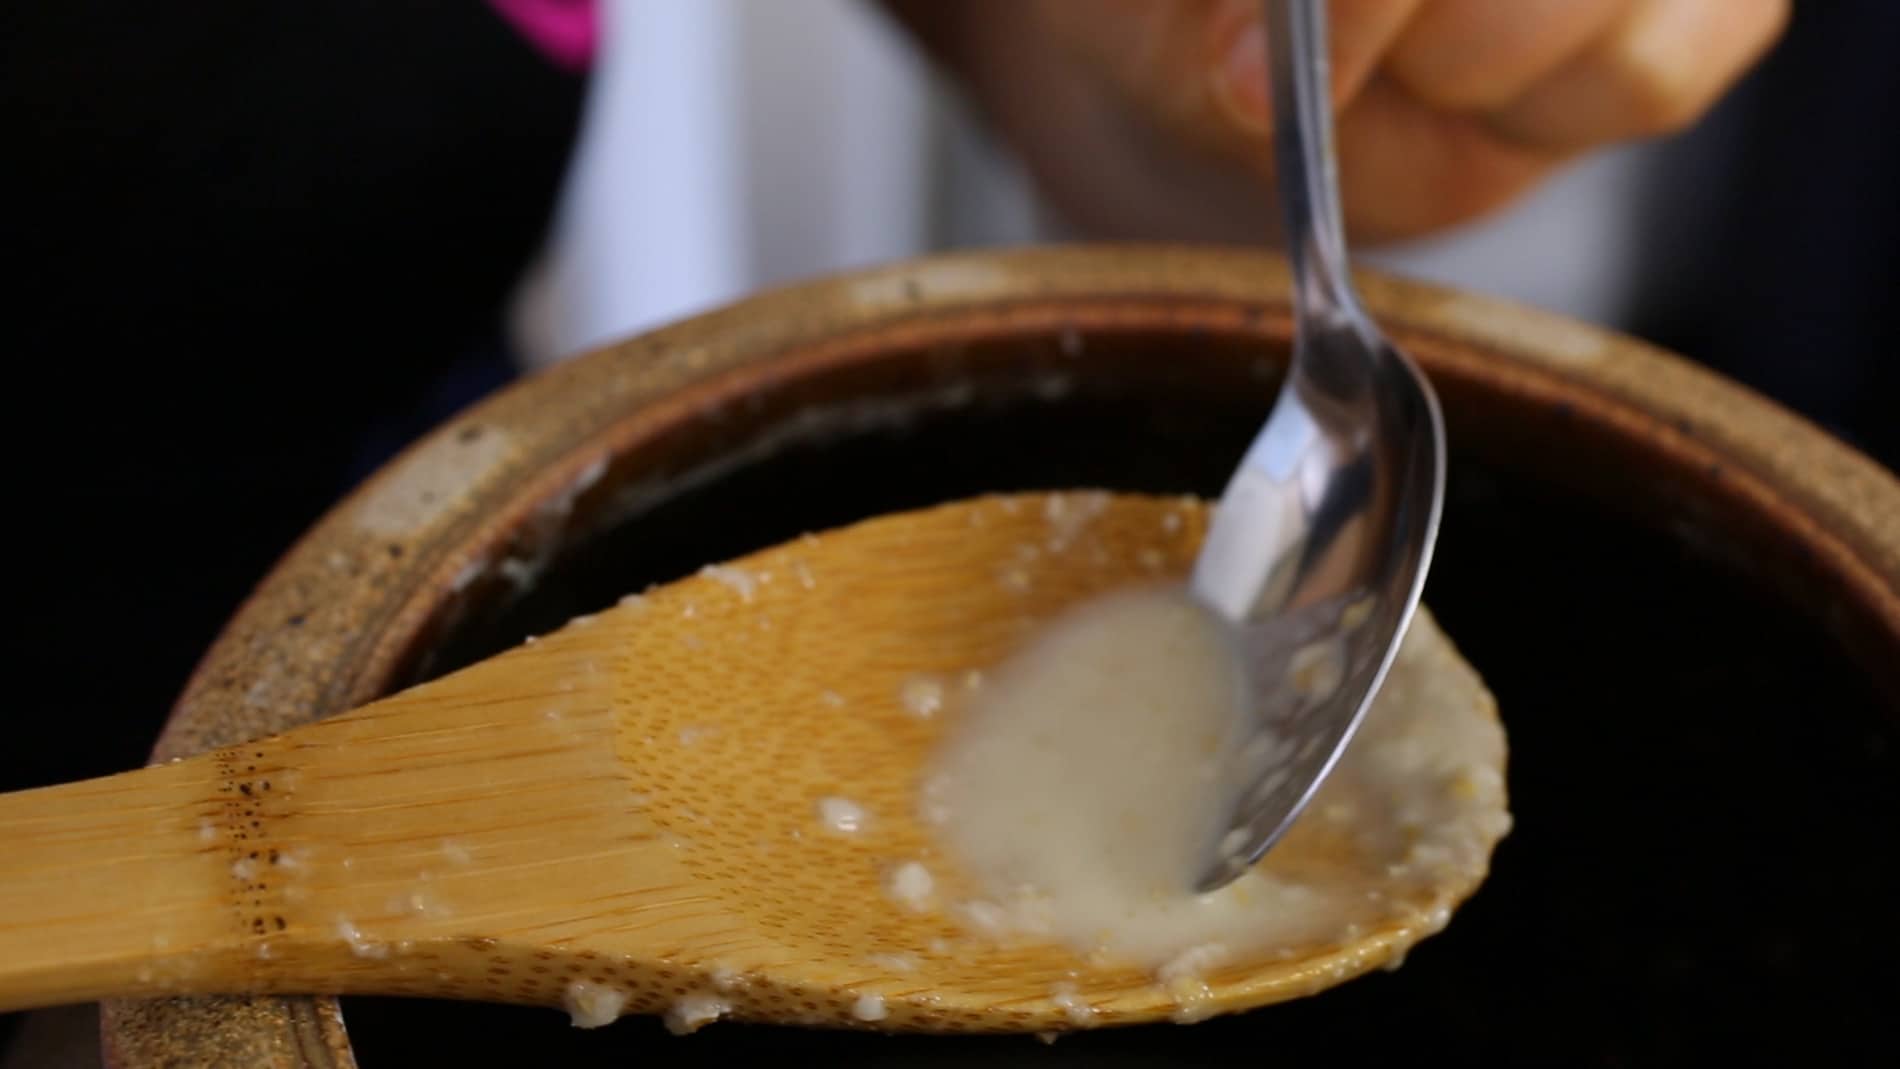
- Strain the makgeolli into a large bowl, pressing on the solids with the back of a wooden spoon to squeeze as much liquid as possible out of it. Discard the solids. Add 8 cups of water to dilute. Add the optional sugar and mix well.


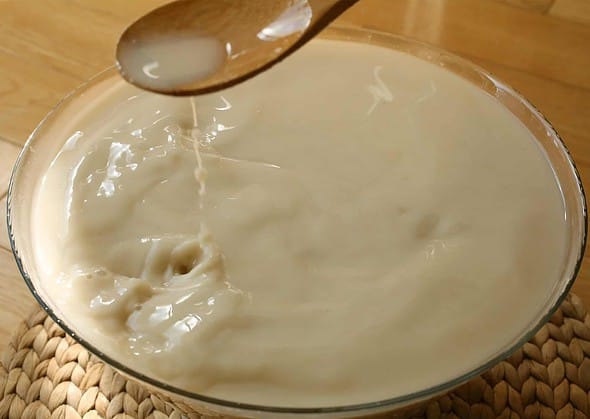

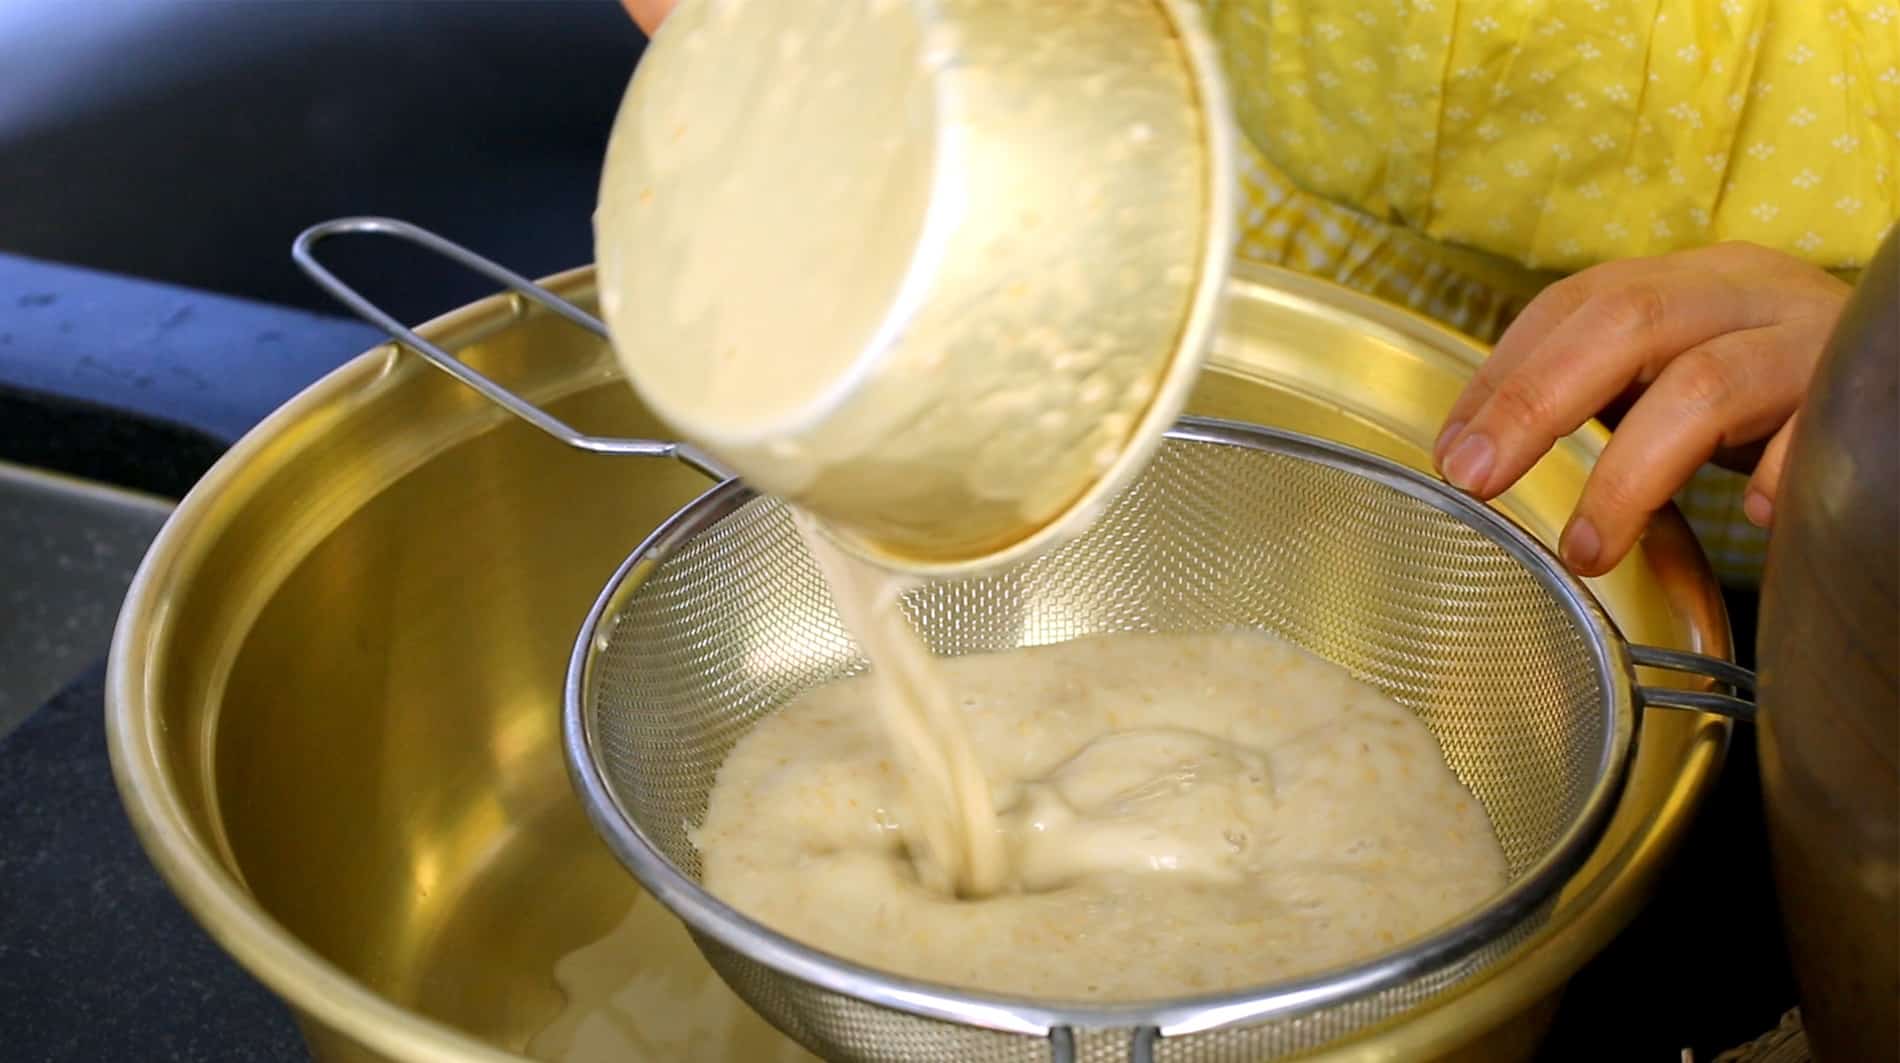
- Strain the makgeolli one more time and put it into glass jars or BPA free plastic beer bottles.
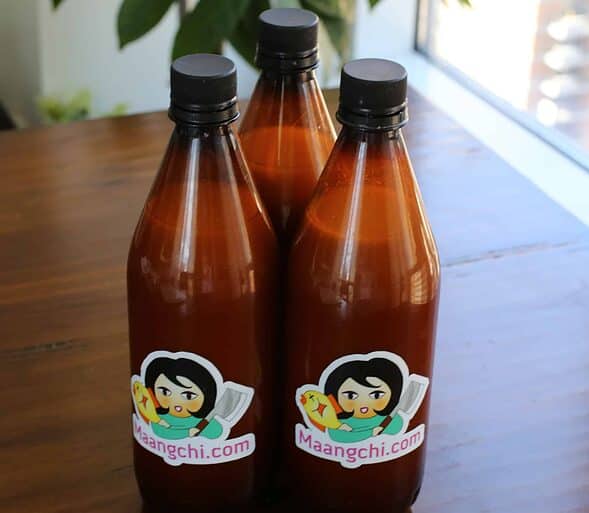

- Serve cold, and stir or mix well before drinking. Serve with kimchi or some side dishes. It can keep in the fridge up to 2 to 3 weeks.


Buy this recipe's ingredients online
I really like Weee! they deliver quality packaged and fresh Korean ingredients to the continental USA. Cheaper and better than Amazon! Check them out!
Ingredients are also on Amazon:
Sorry, we're unable to load product information at this time.

I’ve seen recipes that include yeast as an optional ingredient. Do you know how the addition of yeast affects the final product?
I am begginer who is interested to try your recipe. Can I steam the glutinous rice instead of cooking it like your method? After mixing everything, what is the ideal temperature to keep it? Do I have to keep it in fridge because my room temperature is about 29 degrees. Is it OK if I use an airtight glass jar or it is recommended to let air in? Thank you.
You can steam rice instead of cooking it in a pot, but you’ll need to soak the rice (or glutinous rice) for a few hours beforehand to ensure it cooks properly. When making makgeolli, I use an earthenware jar, so I’m not sure how well a glass jar would work. A room temperature of 29°C is quite warm, but I would still recommend fermenting makgeolli in a cool spot in the house rather than in the fridge. The fermentation time will likely be shorter than usual. Good luck!
Steaming the rice to make yakju right now, as I type. Will also make makgeolli with the lees (the bottom sediment) as you describe in your book. I am so excited to find these recipes in your book. I’ve made hard cider and also apple brandy but I’ve never made any kind of rice alcohol. Please wish me luck! I will send a photo when I’ve gotten a little further down the path…One question: You used bellflower root to flavor your yakju, and I was excited to see a sign that said fresh bellflower root in the produce section of a Korean grocery when I was in civilization (I live hours from anywhere). I was going to use that instead of dried because the flavor of fresh herbs is almost always more intense than that of the dried. But when I got the package home, I noticed the label said “Aralia root”. Bellflower is not an Aralia at all, and in fact, I don’t see any culinary uses for Aralias, so maybe the sign on the shelf was correct and the one on the package is wrong? The package of dried bellflower root says the Latin name is Platycodon grandiflorus. Anyway, I’m going to use the dried root, but I am wondering whether you can shed any light on what these fresh roots are?
The Korean name of the root is right – Deodeok (더덕) is “Codonopsis lanceolata”.
https://en.wikipedia.Org/wiki/Codonopsis_lanceolata
Thank you so much, Sanne! So it IS a type of bellflower. Well, darn. Could have used it. Just today I strained out my yakju made with the dried bellflower root, and also made some tasty makgeolli. I still have the fresh roots; maybe I should plant them?!?
Thanks, sanne!
❤️
So excited that you featured my photo in your newsletter! I just want to thank you, Maangchi, for sharing your incredible knowledge of Korean cooking. Over the years, I have made many of your recipes, and it is clear that you are meticulous about your editing; every one of them comes out delicious and I rarely have to adjust the flavor balance beyond what you recommend. Also your videos are so much fun; they always bring a smile to my face! Thank you for doing what you do.
Oh, you are reading my newsletter, too! : )
http://www.maangchi.com/letter
Keep up the great work with your Korean culinary adventures!
Is there any way to use the solids discarded in step #9? No criticism intended! It’s just that I am always sad to waste food. <3
If you bake your own bread, you may use some of it there for malt. Dehydrate what you don’t immediately need.
I just was to thank you for introducing me to makgeolli brewing! I started several years ago and found that I really love it. I’ve been developing my own recipes and working on some flavored versions. For the new year, I’ve moved to a bigger onggi and added temperature control as I start my first attempt at a maple makgeolli!
Fascinating! I’m curious about the taste of maple-flavored makgeolli!
The little one is my old fermenter. The big one is my new 22L onggi
Wow, you’re making a large amount of makgeolli! My grandmother used to make a huge amount of makgeolli during holidays too. It’s so touching! The homemade makgeolli tastes much better than the store-bought ones. Happy New Year!
Just refrigerated a big glass jar of nappa / daikon / carrot and baby shrimp kimchi. My rice for the maakgeoli is in the dehydrator. I had to go to the store, as I couldn’t find my yeast, but I needed dog food and wings anyway. Just coated the wings in ginger / garlic / and cayenne pepper paste. It’s gonna be a good week. Then the next week I’ll bottle up the maak. I use a big German ceramic kraut pot.
DELICIOUS!!! I can’t believe I can make makgeolli at home so easily!! Making this makgeolli in my onggi; I have two small ones now, but want a much bigger one to make huge batches; Maangchi, can I simply double (or triple) everything to make a big batch? Lived in Korea for 7 years and I can’t believe I was buying makgeolli the whole time when I could have been making it myself! And it’s more delicious! Thank you for all your incredible recipes, Maangchi! They warm my heart as they always make me think of my time in wonderful Korea!
Thank you so much Maangchi!
I always bought some Makgeolli in my Korean grocery store but I often thought it was a little, I don’t know… artificial. Since I made it by myself and tastet it with self made Kimchi, I was just so overwhelmed, it made me so happy! And the people, I proudly presented it kind of felt the same. Everything tastes better, when it’s homemade, made by heart :)
Dear Maangchi,
I noticed your dehydrator has plastic racks. Do you think it would be okay to use stainless steel racks?
it’s bubbling? when it stops bubbling it’s done. nature will advise
Hi. Is there an alternative for nuruk? I can’t seem to find it anywhere here and the sites that sell it are expensive.
You can get it for 10 dollars on amazon
Maangchi, I’ve been using your recipe as my base for a while now and started experimenting with mixing in some chappsal and using some different yeasts. I just bought my first onggi, and like you, plan to ONLY use it for makgeolli. My question is: do you completely wash/sanitize your onggi between batches or just give it a good rinse? My attitude from the start is that if makgeolli was traditionally made by farmers, things can be clean without getting too obsessed with sanitization.
Hello!
I followed the guide for making this! It seems to have turned out great, but I was wondering something about the nutritional information.
If you follow the recipe exactly, about how many carbs/net carbs does it end up having?
Just curious! Since the makgeolli you guy at the store seems very low but I’m not sure if it’s watered down.
If I didn’t want to use nuruk (I’m allergic to wheat), can I use koji instead? Would it be a 1:1 substitution (ie. 1-1/2 cups of koji)? I tried looking for rice-based nuruk but couldn’t find any.
Hi Maangchi,
Got your book for a birthday present and until then didn’t even consider I could make my own Makgeolli!
Just ordered my Nuruk to do this recipe – looking forward to trying it.
Nuruk is pretty difficult to get over here (I’ve ended up ordering it from eBay and it’s coming from South Korea).
With the Nuruk/Yeast that you strain out of the Makgeoli before bottling… Is it possible to save this and use as the starter for another batch?
I’m hoping the answer is yes so I can make a lot more and also pass some on to friends to use to make their own also :-)
Thanks
Tim
on the outside of the naruk packet it only lists amylase. thos it is obvious other ‘stuff’ is present. if this is correct, amylase is available almost everywhere and on amazn.
Hi, So far its seems to work well. Its been 9 days since i start it but its still making buddle (too frequent if i compare with your). Should i leave it in the pot until it almost stop making bubble or should a transfert it into the bottle and the fermentation still gonna continue?
Thank
Thanks for the recipe! I am making makgeolli. It is day 2 and the rice is only partially liquified. However, the smell and taste is already strong (burns a little), and not sweet at all– did I do something wrong? Should I keep fermenting, or strain it now?
I’m not sure if I’m missing something or if something was left out. I have 5 cups of rice, I’m supposed to add only 4 cups of water then cook those 5 cups on medium-high for 15 minutes. After those 15 minutes the rice is already starting to burn and stick to the bottom of the pot. Then I’m supposed to not add any more water and just cook it for another 15 minutes? If I don’t add more water the rice will be burnt to a crisp and have an inch of burnt rice stuck to the bottom of the pot…
Did you cover the rice? When it starts to boil turn it down to simmer.
I am trying this out with brown rice. Have you ever done it Maangchi? Day seven here is how it looks.
I’ve never made makgeolli with brown rice. How did it turn out?
…or use a rice cooker. ;-)
Did you first soak the rice for the recommended time? Soaked rice has absorbed some of the liquid that’s why she says only 4 cups water. When making my rice tho i used equal parts rice and water and it turned out fine.