


Today I’m really excited to share a recipe with you that’s one of my family’s favorites and has a lot of meaning for me. It’s bread rolls, or “roll-ppang” in Korean. “Ppang” is Korean for bread, and “roll” is a Korean word borrowed from English. You might think that this recipe has nothing to do with Korean food, but it’s something many Koreans make at home.
This is one of my family’s favorites and brings back good memories for me, when I used to make these as a snack for my children when they came home from school. They were so happy to smell and see the rolls when they got home, I never forgot the looks on their faces and it makes me smile, even today.
If you’ve been cooking for a long time like me, you know that certain recipes remind you of certain periods of your life when you made them all the time. These bread rolls are like that for me: whenever I make them again I’m reminded of when my children were young and studying hard. Now they’re all grown up and I don’t cook for them anymore, but we all have good memories of roll-ppang. I hope you enjoy these with your family, too!
This recipe was taught to me by a friend of mine in Korea. She studied nutrition and was a great cook. She had three sons and her house was always full of food! The first time she showed me how to make these I couldn’t believe how delicious they were! I rushed home to make them for myself. So light and fluffy! For me and my friends, the ideal roll-ppang splits apart into light pieces like perfectly cooked chicken breast. Her recipe is perfect every time. The key is to let them rise the second time for a full hour. Even if they look perfect after 30 minutes, let them rise for the full hour, and they will be super-fluffy!
I always served these rolls with milk and homemade strawberry or grape jam, two things my children also loved. It was a perfect snack between lunch and dinner, but me and my friends experimented with this recipe to make all kinds of things: fried twisted donuts, buns with vegetable chunks inside, and even sausage rolls. You could also serve them as dinner rolls with a bit of butter.
In this recipe i made a small batch, but you can double or triple the recipe, whatever you can eat comfortably over a few days. If you make a larger batch, you’ll have to keep the rolls in the fridge as you form them, otherwise by the time you finish forming the last one, the first one will have started to rise already! For large batches, I recommend you put them in the fridge one by one as you make them, and when you’re finished bring them out so they can rise all at once.
Enjoy the recipe and let me know how they turn out!
Ingredients (for 6 rolls) Serves 3 to 4
- 3 tablespoons butter
- ½ cup cold milk
- 2 tablespoons sugar
- ¼ teaspoon kosher salt
- 1 large egg
- 2 teaspoons dry yeast
- 1 ½ cups plus ¼ cup all purpose flour
- 1 egg white
Directions
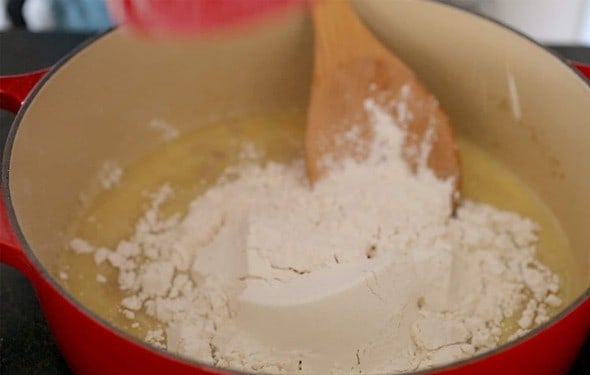
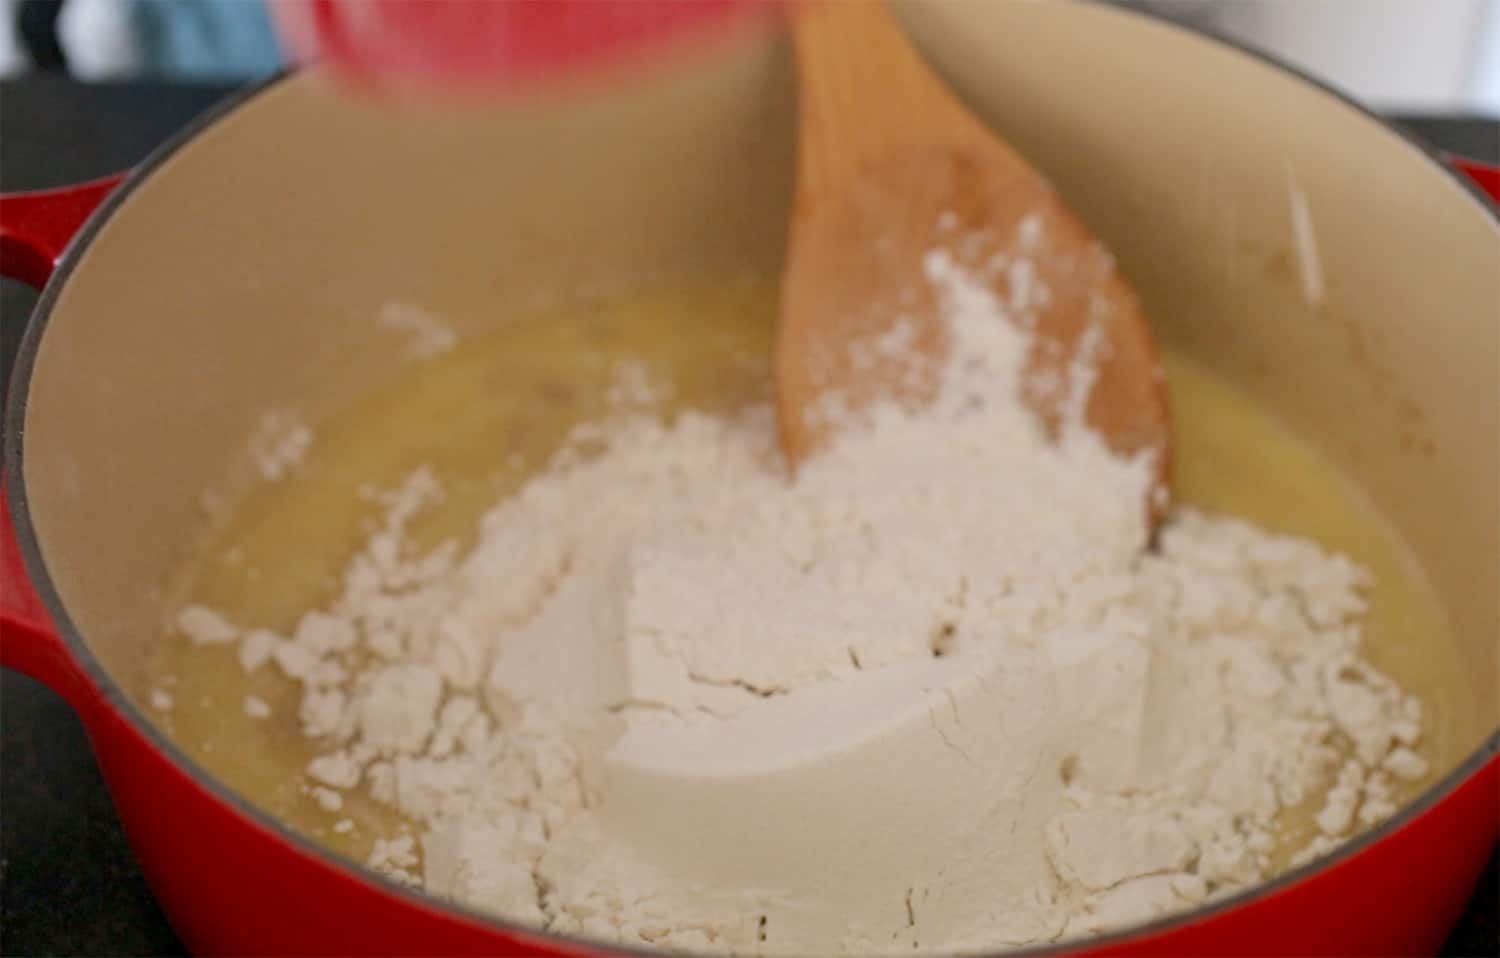
- Heat the butter in a large heavy pot. Turn off the heat.
- Add the milk, sugar, and salt. Mix well with a wooden spoon until thoroughly dissolved.
- Crack the egg, add to the mixture and mix well. Add the dry yeast and let it all sit for 1 minute.
- Add 1 ½ cups flour and mix well with the wooden spoon (or rice scoop) for about 1 minute. The dough will be very sticky.
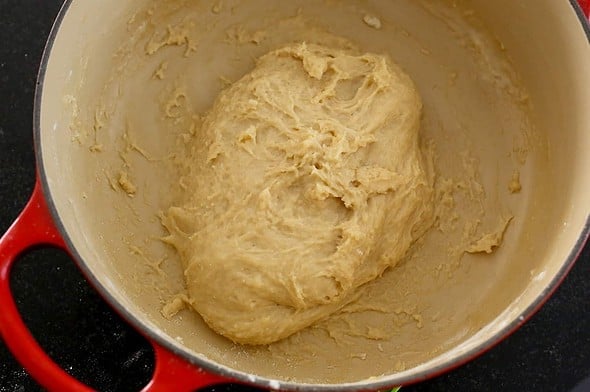

- Cover the pot and let it rise for 1 hour until it doubles in size.
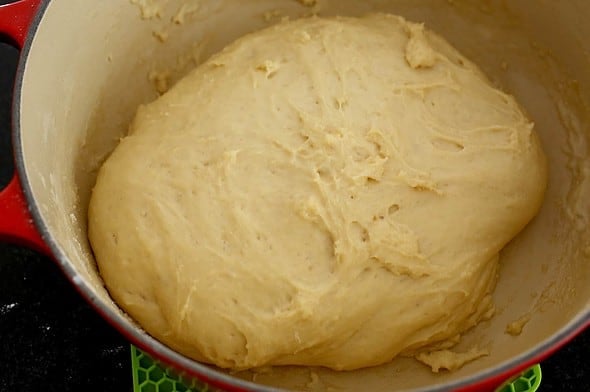
- Deflate and knead the dough by hand for 1 to 2 minutes and cover again. Let it rise for 30 minutes.
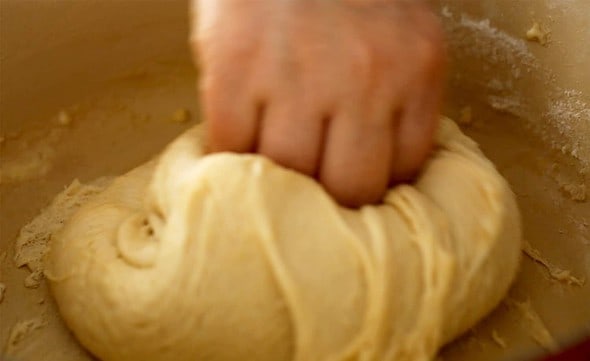

- Deflate and fold the dough for another minute until it makes a smooth dough ball.
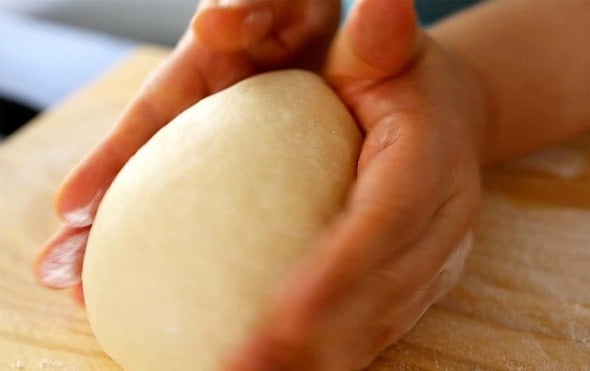

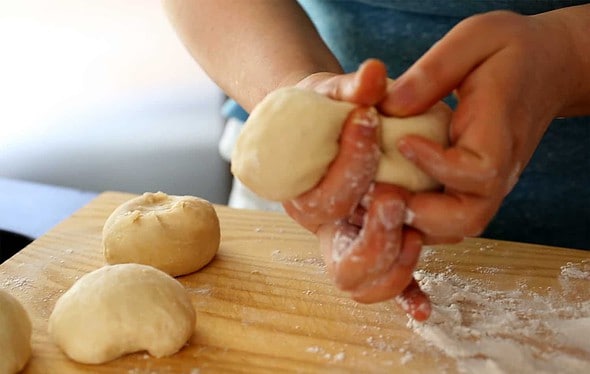
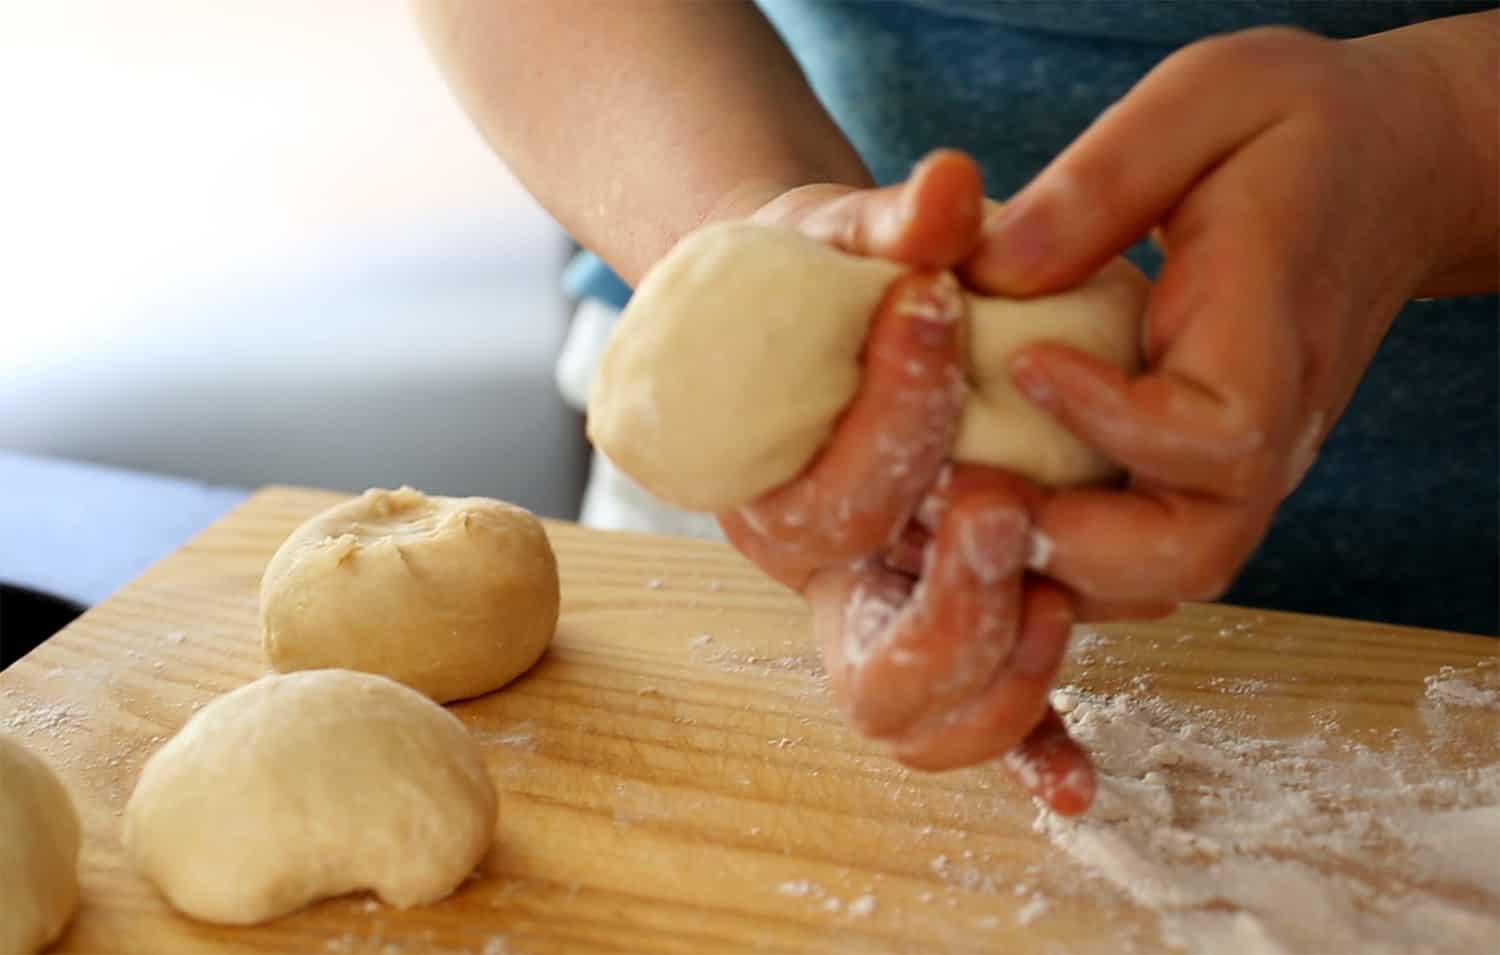
- Place the ¼ cup flour on the cutting board and sprinkle with some flour. Transfer the dough ball to a dusted cutting board and divide into 6 equal size pieces.
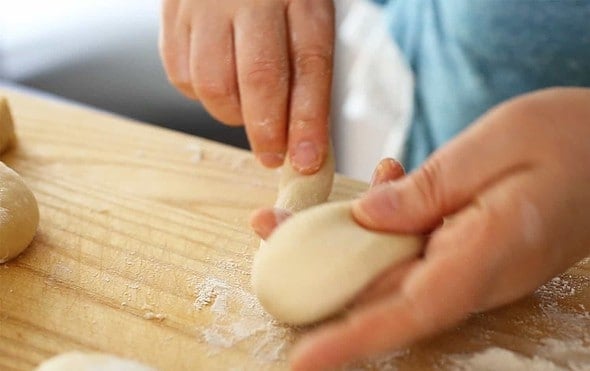
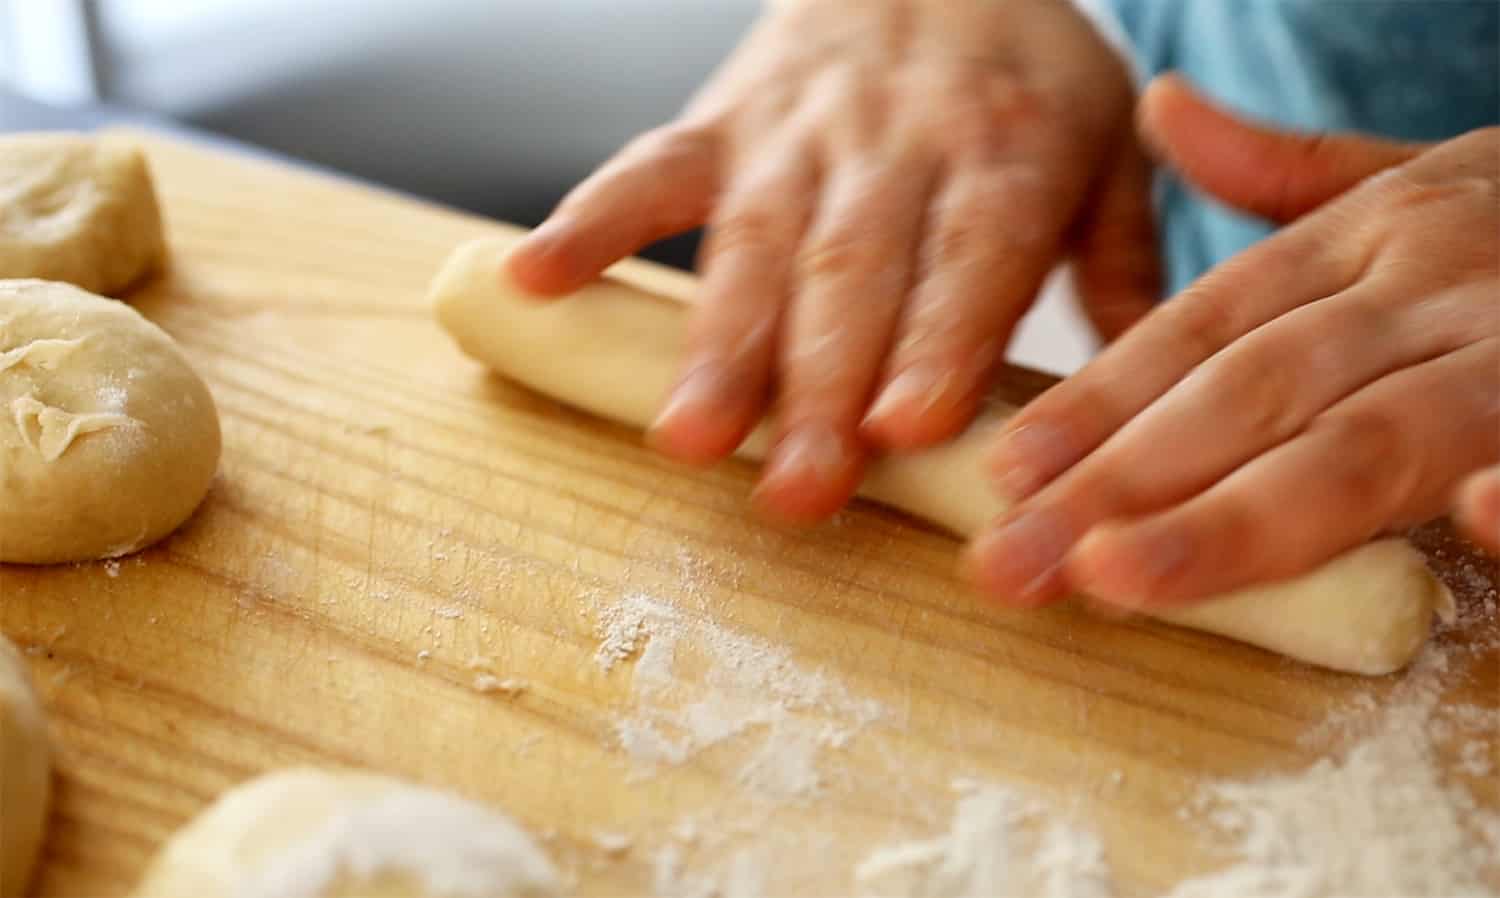
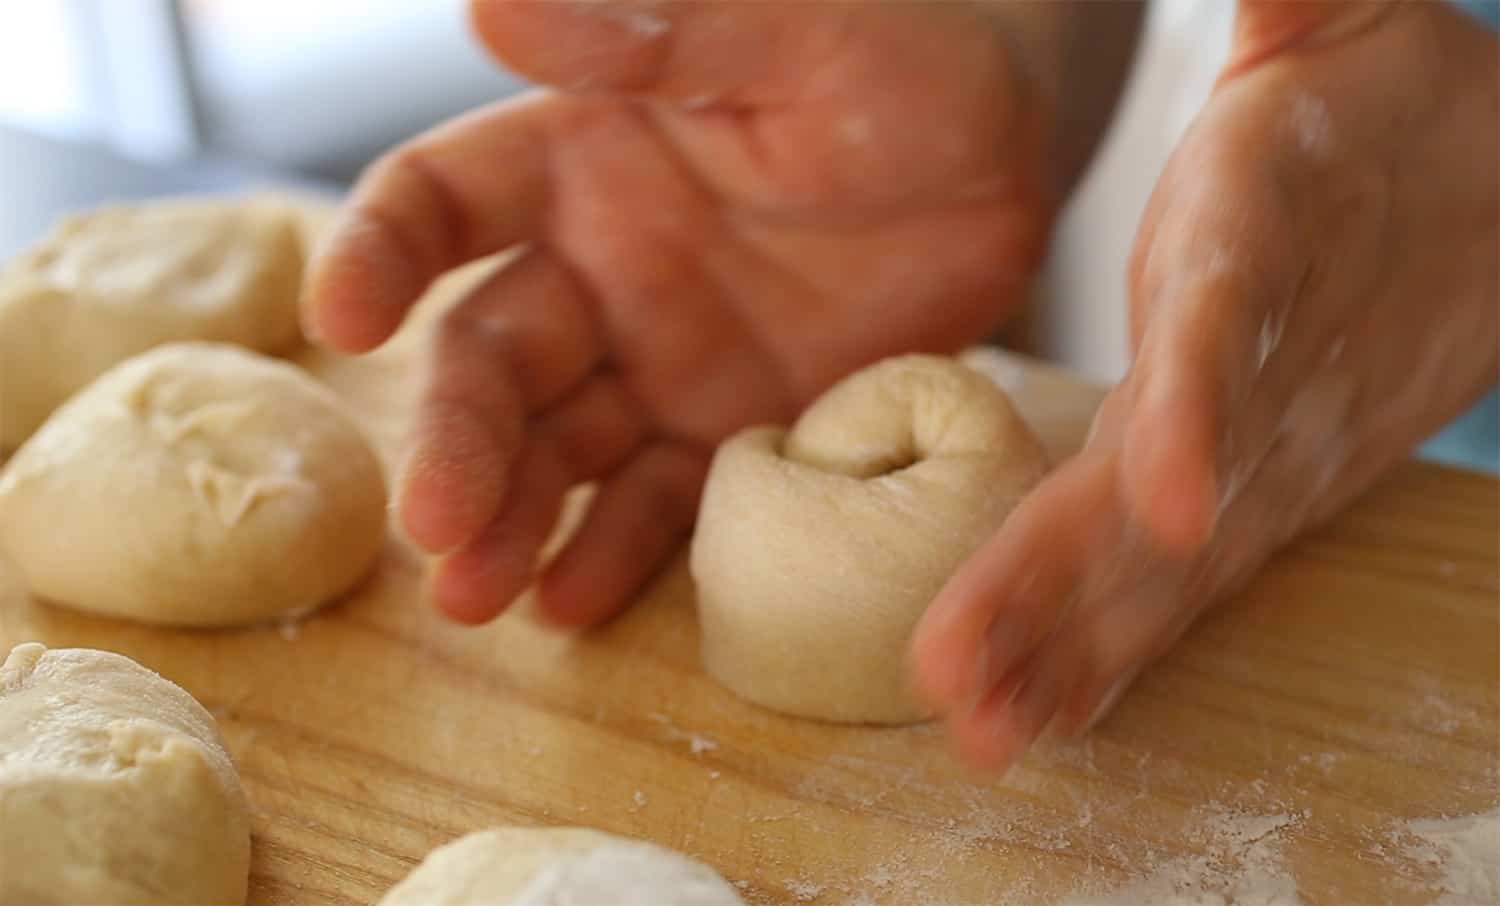
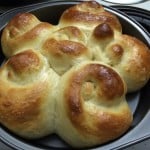
- Rub a piece of dough between your hands until it forms into a cylinder. Put it on the dusted cutting board and roll it out with both hands until it’s about 8 inch in length. Coil it around itself and bring the end from the bottom up and over to the top of the coil so you can insert it into the center. The dough is very soft and sticky. When you shape the rolls, dust your fingers with some flour so the rolls don’t stick to them. Put it on a non stick baking pan (I used 7 x 8 inch pan in the video).


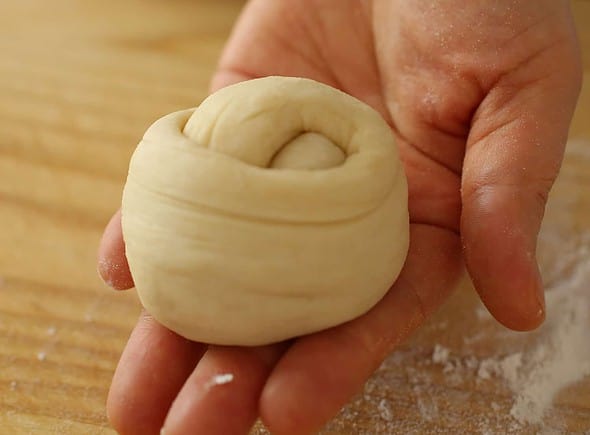

- Repeat with the remaining dough pieces. Be sure to leave enough room in between the rolls for them to expand.
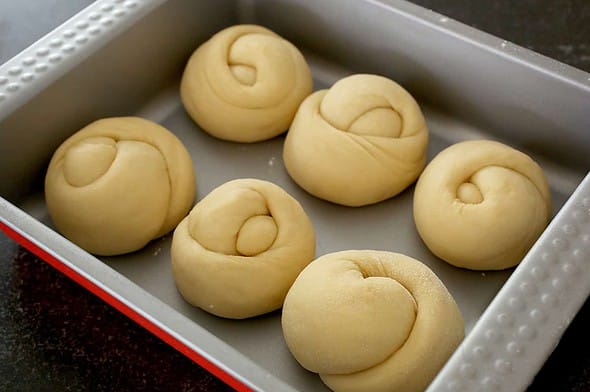
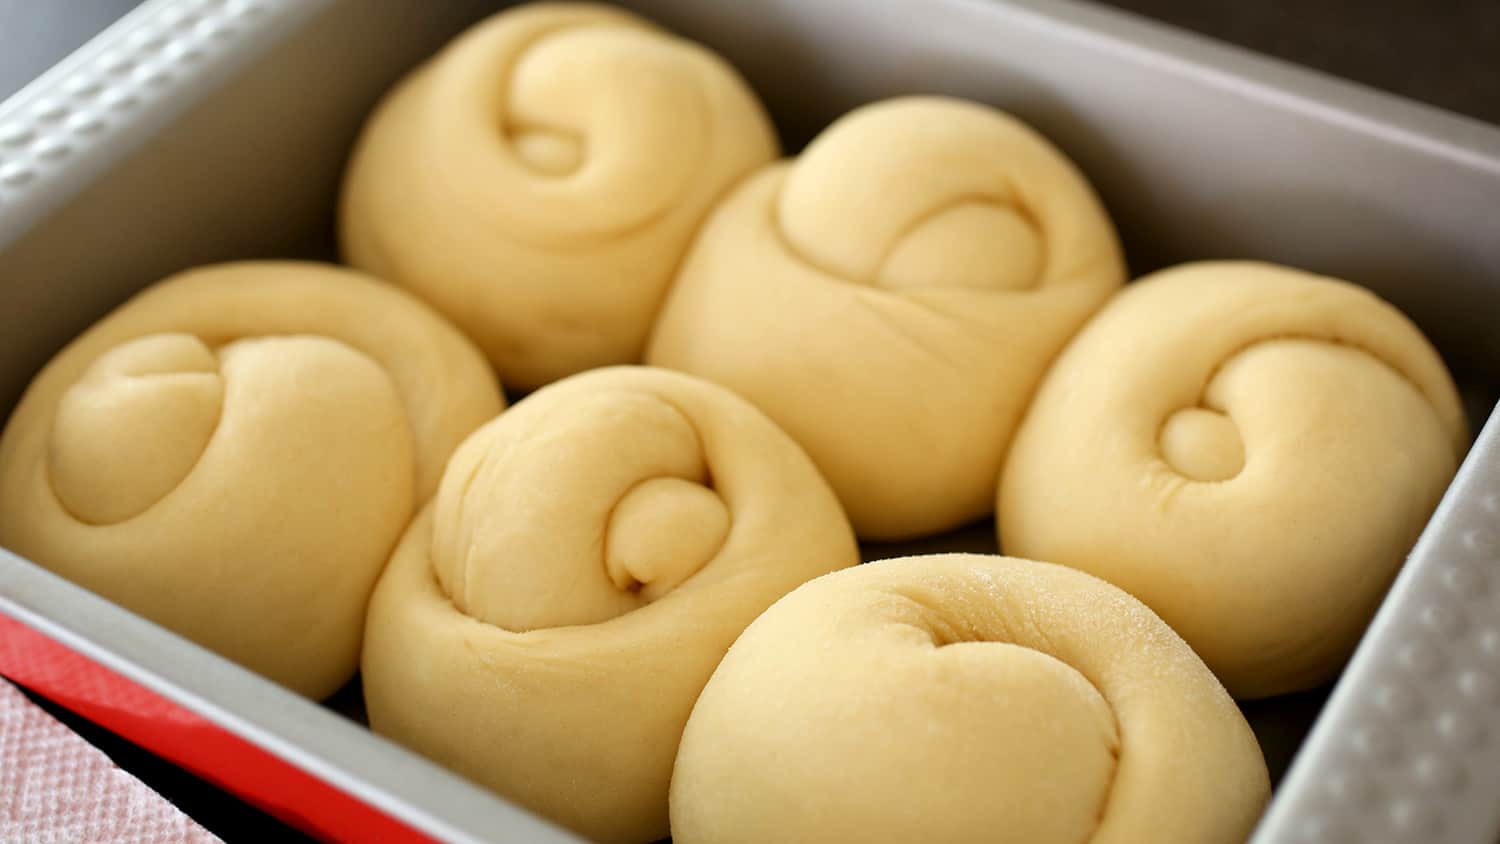
- Let it rise for 1 hour.
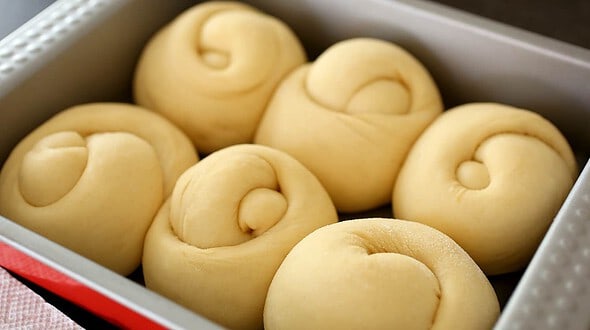

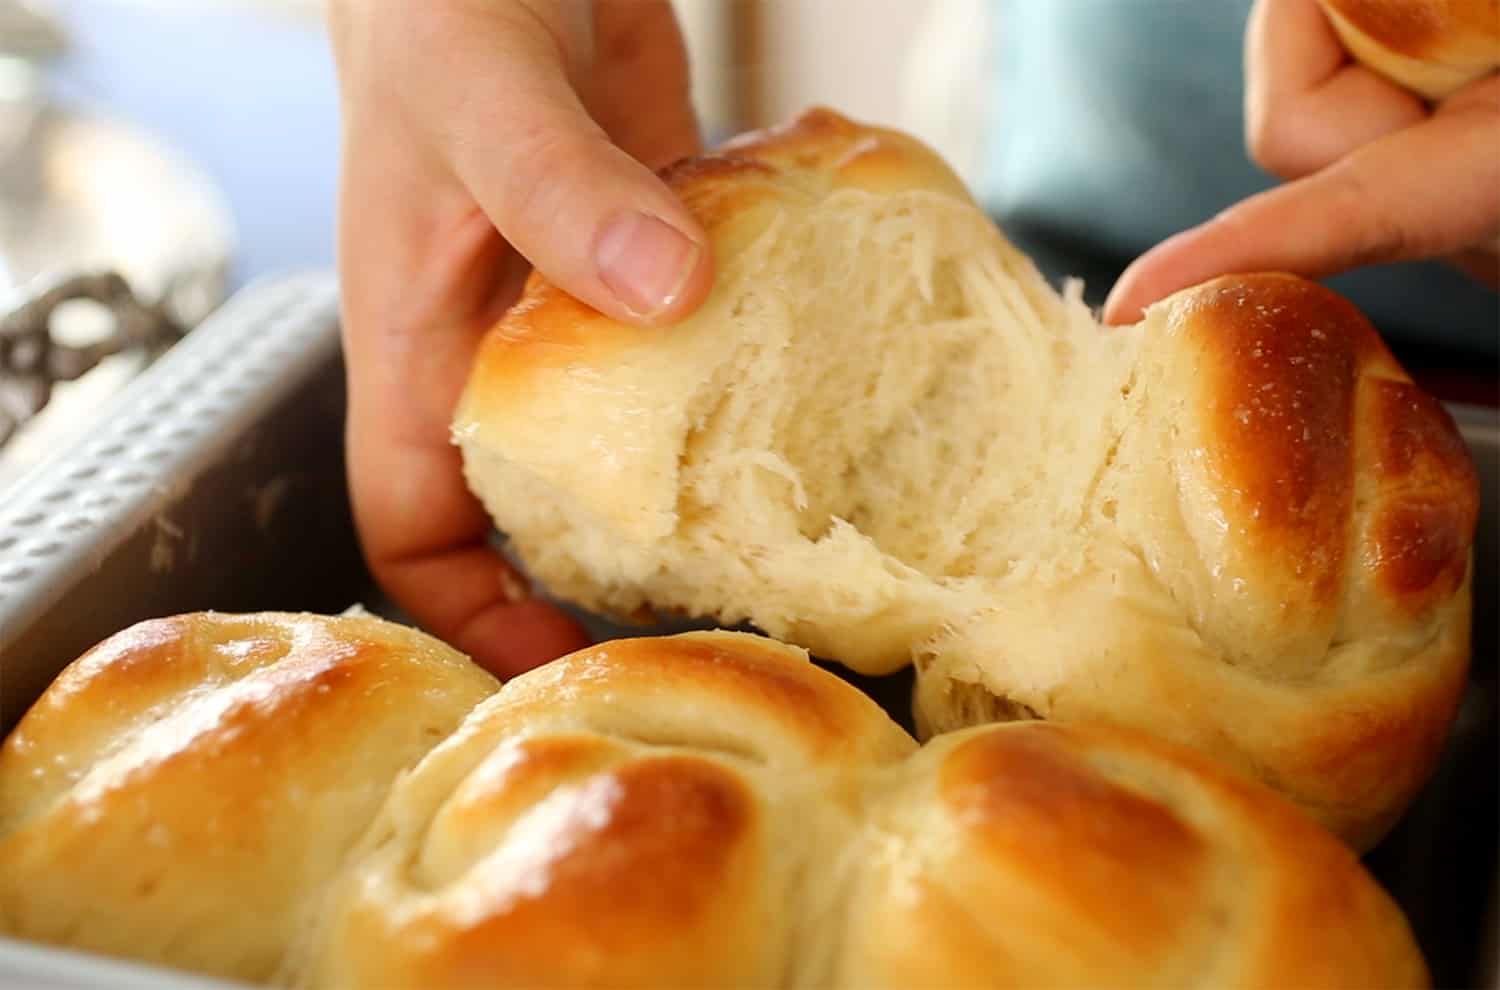
- Preheat oven to 350° F for 5 minutes. Gently brush the rolls with the egg white and bake for 15 to 17 minutes until light golden brown.
- Brush the remaining egg white onto the rolls. Bake another minute.
- Remove it from the oven and serve hot.


Maangchi's Amazon picks for this recipe
It's always best to buy Korean items at your local Korean grocery store, but I know that's not always possible so I chose these products on Amazon that are good quality. See more about how these items were chosen.


안녕하세요 Maangchi
Tried your Roll-ppang recipe. Wow very sticky dough to play with on 1st proofing. But as more proofing done, all went well. Instead of 30 mins on 2nd proofing, I did 1 hour as suggested in your note. So soft and fluffy and basically just melt in my mouth ppang texture.
감사합니다!
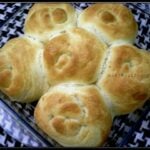
See full size image
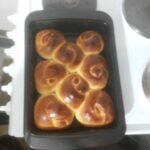
Your roll ppang looks perfect!
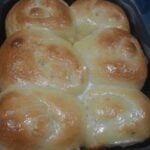
Hi, Maangchi! Thank you so much for sharing your roll-ppang recipe. I made these rolls few days ago. They turned out super light, fluffy, and delicious.
See full size image
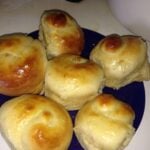
Hello Maangchi!
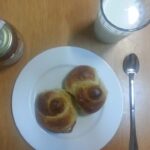
Thank you very much for this recipe. It was my very first time baking bread and I was a bit nervous. I think they turned out very nicely thanks to your explanation! The smell is buttery, sweet, and reminds me of a bakery. The texture is fluffy and soft. And the taste is simply delicious. I will surely double the recipe next time as only 6 rolls were not enough for my appetite. much love :)
See full size image
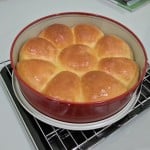
Hi Maangchi,
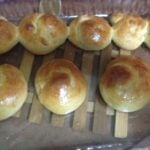
This recipe was so easy to make loved the bread rolls.!
See full size image
I love your roll ppang! 3 cute fluffy amigos on the plate! :)
@Baking Queen, No wonder you chose your id as Baking Queen! Congratulations!
Hi Maangchi,
Can I use bread flour instead of all purpose flour in this recipe? Will it turn out fine?
Yes, you can use bread flour.
Hello Maangchi! I live in Singapore and after reading the comments of reducing the milk by 1 tsp, kneading it enough the 2nd time too before rising (I even used a bread maker to knead), proofing it according to the directions, I still ended up with a dough so wet that it looked like melted ice-cream. Help! What advice do you offer for those who live in humid countries?
Hi! I bake some type of bread or rolls almost every day. What I have learned over time is that all ingredients should be measured precisely except for the flour. What I do, is that I measure the flour into the cups with a spoon. I do not scoop it out of the bag with the measuring cup, because that will give you too much flour, resulting in dough that is packed down and very hard to work with. If you scoop it into the cups, it will result in a much too wet dough that you add flour to as you knead it. I usually have one of my kids with me while I knead the dough. They stand there with a bag of flour and as I am kneading it I will say, “ok! Add some!” And they will add a small handful of flour. I knead that in, and when it gets sticky again, I say, “Ok! Add some more!” And they add more…this goes in for the full time I knead the dough, which I usually do for about 15-20 minutes the first time, regardless of instructions. (I don’t know what Maangchi said about kneading time because I usually do it until it feels right, which is about 15-20 minutes, adding flour the whole time.After the first kneading, I still add flour to it as I go, but I don’t knead as long…usually just maybe 5 minutes or so, adding flour as it becomes wet, and then when it is kind of smooth and firm I allow it to rise.
I hope this helps! Remember: all the other measurements should stay exactly as they are! Only add flour as you go…
Actually…thinking of it, if you are kneading it without kids standing there making it very inefficient, you might want to knead for about 5-10 minutes. My kids interrupt me, want to “help,” etc, I was thinking about it, and realized that if you full-on knead for 15 minutes you would probably be really overdoing it.
Hi Maangchi!
I used this to make sausage rolls! They were delicious!! Thanks
See full size image
You made sausage rolls instead of bread rolls! Yummy! Yes, you can be creative with the same dough!
Thanks for this versatile recipe Maangchi!!!
See full size image
Can I use bread or cake flour with this recipe?
They turned out great! We added more sugar because we like our bread very sweet. We even used them to make hamburgers.
I put honey on top and then put them in the oven after the egg wash.
See full size image
Hi,
Please did you use 2 TEASPOONS of yeast or 1 teaspoon ?( your rolls look great by the way!)
Stay safe
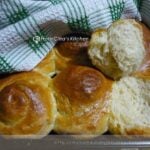
Been using this recipe for 3years now,i do make sausage rolls also.thank you for the yummy recipes..
See full size image
Interesting! I used to make sausage rolls with the same dough, too! Cheers!
I made these with my 6 year old daughter after we watched your video! She was super excited and had fun rolling out the doe here is a picture of our final product. Tha k you for making your videos so cute :)
How can you use this recipe with a stand mixer, dough hooker
Or can you?
P.S. It looked like bread and felt like bread, nice, soft fluffy bread. But smells and taste bad
My bread also smells very bad. Its the smell of yeast. How can i get rid of it? PLEASE HELP
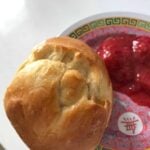
I made these for the first time today and they turned out amazing! Smells incredibly delicious and I ate them with raspberry jam.
See full size image
I’ve tried this bread roll recipe 2 times. But each time it had a strong alcohol smell and smells really bad. Please help?? What did I do wrong?? Is it really 2 teaspoons of yeast??
I’ve never made bread before. I’m trying to figure this out before Thanksgiving November 28, 2019
Hi dear,
Maybe you proofed for too long. Next time, check the dough at 45minutes. If its double in size already, go ahead with the next step you don’t need to wait for 1hr. All the best